

The BeerSmith 2.3 update features some significant changes to the user interface as well as powerful changes in the brewing engine. This is a big update, so this will be a pretty long post. Here’s a summary of some of the new changes and how to use them! Note that you can download the new version here.
 The Session Tab

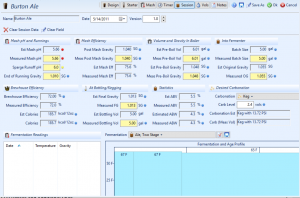
A new session tab replaces the old fermentation tab and lets you record session readings in one place to you can compare measured and estimated values. Each field is color coded yellow until an actual value is entered making it easy to track the items you have entered from the ones still to be done. A Clear Session Data button near the top sets all of the values equal to the estimates so you can easily reset for another batch, or you can clear the current field with the Clear Field button.
Near the bottom of this tab I’ve also added support for fermentation tracking and you can enter fermentation gravity and temperature readings and graph them against your planned fermentation profile.
 Simplified Recipe Editing Dialogs
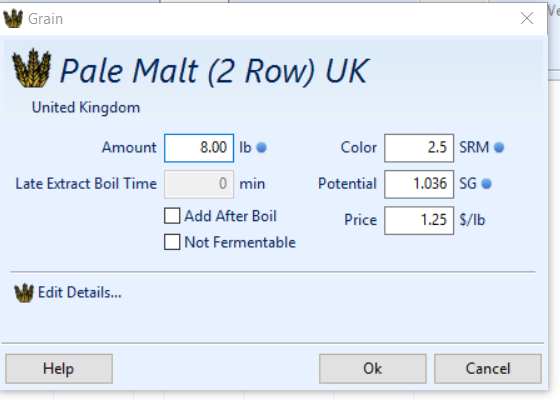
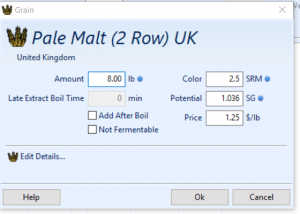
When you open an ingredient for editing, BeerSmith now shows a simplified dialog with focus on the amount of that ingredient which makes it much easier to quickly adjust it. You can still get the full details by clicking on the Edit Details… button a the bottom of the ingredient. The old style of editing is still available from Options->Look and Feel – Simplified Recipe Editing checkbox if you want to turn this feature off.
Improved Ingredient Entry
You can now change the amount of an ingredient by editing the amount column directly on the ingredient list by clicking on it – never even opening a dialog. Enter the name of a unit after the number to convert units (for example “3lb 2 oz” or “2.3 kg” works in any field)
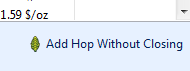 Adding/altering ingredients is easier too. The new add ingredient dialogs all have a button that lets you add the currently selected ingredient without closing the dialog so you can enter a bunch of hop additions or grains quickly. You can also now select multiple ingredients and delete them all at once.
Ingredient Keyboard Shortcuts Added
Keyboard focus issues were corrected and shortcuts have been added so you can easily add ingredients using the keyboard (Ctrl-Y for yeast, Ctrl-W for water, etc…) as long as the ingredient list has focus. Here’s the full list – these are active only when the ingredient list has keyboard focus. On Mac you can use either the Control or Command key for most shortcuts, though Ctrl-H must be used to add hops since it is a reserved “Hide window” combo on the Mac. The Mac Control- combos were added in 2.3.6
- Del = Delete, Ctrl-H = Add hops, Ctrl-h = Add hops, Ctrl-M=Add Misc, Ctrl-Y=Add yeast, Ctrl-G=Add grain, Ctrl-W=Add water, Ctrl-D=duplicate, Ctrl-s=Substitute, Ctrl-A=Select All
+/-/==Increment/Decrement amount, Ctrl-z=Undo Last Item, and the “[” or “]” keys will decrement or increment time for item
Copy, paste, duplicate, and an undo button are now active on the ingredient list making it easier to handle small changes. As mentioned you can now select multiple ingredients by holding the Ctrl or Shift keys when selecting ingredients.
- Ctrl-X = Cut, Ctrl-C = Copy, Ctrl-V = Paste, Ctrl-D=Duplicate, Del=Delete selected, Ctrl-Z=Undo last ingredient change
Finally the escape and enter keys now work properly to close dialogs and can even be enabled for recipe tabs (if desired) by going to Options->Look and Feel and selecting the Close Tabs on Escape/Enter checkbox in the top section of the dilaog.
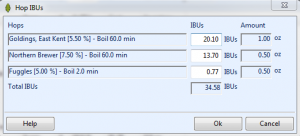 New Hop IBU Adjustment Tool
You can click on the new Hop IBUs button next to the various add ingredient buttons on the recipe design tab to adjust individual IBUs for all of your hop additions at once. This makes it easier than ever to quickly balance your hop bill including boil and whirlpool hops.
Space for More Custom Fields
The space for custom fields on the bottom right of the design tab has been doubled to 26 fields (two columns). Use the Select Fields button on the bottom right section of the design tab for any recipe to add new fields to the listed ones to customize what you are seeing when building a recipe.
Water Analysis
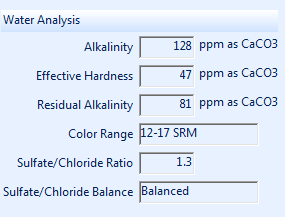 Water analysis is now built into the water ingredient profiles. From Ingredients->Water you can add your own local water profile and get an instant estimate of Alkalinity, Effective Hardness, Residual Alkalinity and the Sulfide to Chloride Ratio. In addition John Palmer’s analysis of recommended color range for an unadjusted mash, as well as sulfide/chloride bitterness balance is included in the water details dialog.
Water analysis has also been added to the Tools->Water Profile tool which lets you take a base water profile such as your local water source and develop water additions associated with a target water profile to brew another beer. If you save water additions along with a water profile the program will ask you if you also want those additions included in a recipe when you use that water profile.
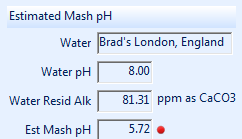 Mash pH Estimation
BeerSmith now includes mash pH estimation directly in the recipe editor. The estimate is based on the water profile used in the recipe along with the grain bill. It does not include water additions directly as these may already be part of the water profile itself. You can view the mash pH estimate on the bottom left of the mash tab.
Mash pH Adjustment
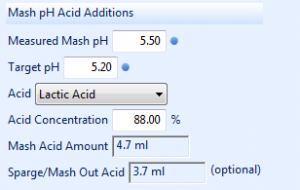 The pH estimate above should help you get close to your desired mash pH range (typically 5.2-5.6) but I do strongly recommend measuring your actual mash pH and using either lactic acid or acid malt to adjust your mash if needed. The tool for doing this is also integrated into the mash tab for every recipe now. On the bottom right of the mash tab you will find a tool to calculate the acid adjustment needed to hit a target pH based on a pH measurement.
To use this feature it is important that you enter your measured mash pH (using a pH meter or precision paper strips) as well as desired mash pH. Next select the acid to use and concentration and the program will estimate the acid amount needed to adjust your mash pH. Note there is also a separate tool under Tools->Mash pH that lets you do a mash pH adjustment separately.
Support for Large Monitors and Retina
BeerSmith 2.3 has much better support for large, high resolution and widescreen monitors. Many of the dialogs are now scaleable and will adjust to fit your wide monitor. I’ve also improved the display on Retina monitors for Mac.
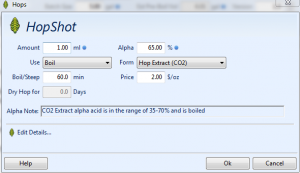 Support for Hop Extracts

BeerSmith 2.3 now has support for hop extracts built into the brewing engine. You can use both CO2 based hop extract (such as HopShots or Hop Jizz) that should be boiled as well as isomerized hop extracts (i.e. pre boiled extracts) that can be added at any point in the brewing process to taste. The default units for these extracts is now in milliliters.
For CO2 extract, use the alpha content of the extract (typically around 65% for many products available to the home brewer) and similarly for isomerized extracts use the isomerized alpha content (often near 50%) for the alpha value. The entire brew engine was updated to handle these additions at any stage though CO2 extracts need to be boiled for proper isomerization.
 Proper Handling of Late Extracts/Sugar Additions
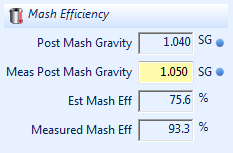
Many people noted that the program did not properly handle late extract or sugar additions for all grain brews (only extract type beers), and that the sugars were included in the preboil gravity estimate. This has been corrected in 2.3, so now late sugar additions will be properly handled both from a gravity and bitterness estimate perspective. Also new fields were added to calculate the post mash gravity of all grain brews separate from the pre-boil gravity (which could include sugars) to give far more accurate mash efficiency estimates. These new fields are on the session tab as well as mash tab.
 Mash Tun Additions and Recoverable Deadspace
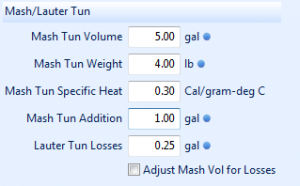
Some brewers working with mash tuns that had large recoverable deadspace were frustrated with earlier versions of BeerSmith which only had a loss (Lauter Tun Losses) entry. To correct this the equipment profiles now have a new Mash Tun Addition field that lets you add additional water to the first mash step to compensate for systems with large recoverable deadspace.
For example, lets say you are working with a BIAB type 10 gallon system that has 1.5 gallons of recoverable space under the mash tun filter screen. Previously the only way to handle this was to manually tweak the mash water amounts to compensate. Now you can simply edit the Mash Tun Addition field in the equipment profile by setting it to 1.5 gallons. Using that setting, an additional 1.5 gallons of water will be used in the first mash step giving you the proper mash thickness. So now you can set up the equipment profile to reflect the recoverable space as a Mash Tun Addition and use it with any mash profile properly.
No Chill, Whirlpool Time and Hop Carry Over in Equipment Profiles
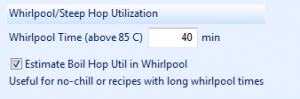 Previously BeerSmith did not carry remaining boil hop additions into the whirlpool. A hop added late in the boil would not be included even for a long whirlpool steep. Now there is an option in the equipment profile to allow for hops to carry forward into the whirlpool and also a new field for Whirlpool Time. If you check the Estimate Boil Hop Util in the Whirlpool box in the equipment profile and include a whirlpool time, the program will estimate the potential hop bitterness remaining for each hop addition at the end of the boil and include that in the whirlpool IBU calculations and overall hop IBU estimates. The time is based on time above 85 C (185 F) as hop isomerization drops off pretty rapidly below that temperature.
This feature can also be used to calculate no-chill brews. By carrying over the hop utilization and setting the whirlpool time equal to the time a “no chill” cube is above 85F, BeerSmith will do a hop-by-hop estimate of the remaining potential for each hop addition and estimate additional IBUs added as the cube is chilling – similar to an extended whirlpool. To enable these features just edit your equipment profile and look for the section on the right column (illustrated here).
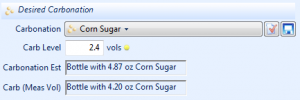 Carbonation Based on Measured Volumes
Many users wanted a carbonation estimator based on actual measured bottling volume as they often come in a bit high or low of the target. The Session tab now shows both carbonation based on estimated bottling volume as well as carbonation based on the measured volume (which you can measure and enter at bottling time). So if your bottling volume is off a bit you can now get an accurate carbonation number without having to resort to the separate carbonation tool.
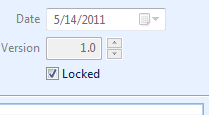 Locking and Unlocking of Recipes
BeerSmith 1.4 had a feature that let you lock a recipe so it could be viewed but not edited. I’ve added this back in to V2.3 – you can check a box on the main design page (just below the version number) to mark a recipe as Locked. Unchecking the box will unlock it. A locked recipe will show up in the recipe list as locked.
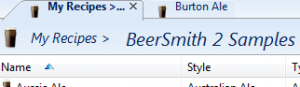 Better Folder Navigation
The title bar for a folder now has parent folders listed and you can go “up” the chain by clicking on the folder name in the title bar. For example clicking on My Recipes in the title bar within a subfolder will take you back to your main recipes folder.
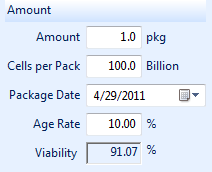 Yeast Age Rate Added
With the introduction of the new White Labs pure pack liquid yeast which does have a slightly longer shelf life, I needed a better way to handle yeast viability and aging. So now each yeast entry has its own Age Rate field that represents the percentage of yeast cells lost as a yeast pack ages. This is used along with the yeast package date to directly estimate the viability of the yeast pack which gives us the cells available for a given yeast package.
If you do create your own custom yeast entries it is important to set this field based on the yeast type. The old age rate fields on the Options->Yeast Starter page are now only used in the yeast starter standalone tool. The recipe starter calculator uses the new Age Rate field for each yeast to estimate its viability.
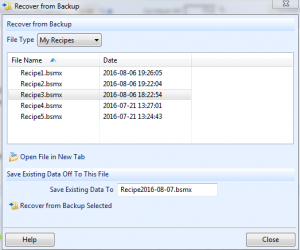 File Recover from Backup Tool
While you can quickly recover a single recipe using the View->Recipe Archive repository added in version 2.2, BeerSmith 2.3 adds a new bulk file recovery tool. Backups are automatically made periodically for your recipes and other data. The new tool lets you view any of these automatically saved backups or alternately recover from one of them.
To view an old backup simply open the File->Recover from Backup tool and select the file type and file you want to view. Next click on the Open File in New Tab. This will open the file selected in a new tab without changing any existing data. You can then work with this file in the new tab to recover selected data using copy/paste as needed.
Alternately if you want to do a full recovery (replacing your existing recipes or other data), you again open File->Recover from Backup and select the file to recover from and file type. Below that you can enter a name where you want the existing data saved to. Finally if you click the Recover from Backup Selected button the program will save the current data off to the file named first, then load the data from the backup file replacing the entire database (recipes for instance) with the backup. This operation cannot be undone so be sure you have the correct data file selected.
Fixes and Much More
In addition to the changes above a large number of bugs were corrected – including better mouse wheel support, better handling of ingredient changes on the fly, better keyboard focus support, cloud fixes, brewing fixes, the new 2015 BJCP style guide, new hops and grains and much more. For a full list of changes you can view the complete change log here. The update can be downloaded here.
Thanks for joining me on the BeerSmith Home Brewing Blog. Be sure to sign up for my newsletter or my podcast (also on itunes…and youtube…and streaming radio station) for more great tips on homebrewing. Also check out the How to Brew Video series I shot with John Palmer if you want to learn more about all grain brewing.
Related Beer Brewing Articles from BeerSmith:
- BeerSmith 2.3 Mobile Released
- BeerSmith 3 – A More Detailed Look
- Ten BeerSmith 2 Brewing Software Tips
- BeerSmith 2.3 Update First Look – Release Date 8 August 2016
- Using the new Session Tab Feature in BeerSmith 2.3
- Whirlpool and No Chill Hop Features in BeerSmith 2.3
- BeerSmith 3.1 New Update Features
- Transitioning BeerSmith Desktop Data to a New Computer
Don't make another bad batch of beer! Give BeerSmith a try - you'll brew your best beer ever.
Download a free 21 day trial of BeerSmith now

{ 48 comments… read them below or add one }
Next Comments →
Any chance you added a feature to allow posting your own inventory to the cloud, so that it can be called up on the mobile app? This would help out greatly when you are at the LHBS and want to see if you need a certain ingredient for your inventory. This feature would be especially helpful to those of us who travel frequently and stop by the LHBS (which in my case is over 90 minutes away) on our way back from the airport. Thanks.
I’m not sure that I can properly express how awesome these updates are.
Very pleased with these changes, thanks much for all the effort to improve Beersmith. Esp pleased with the expansion of the whirlpool hop calcs and addressing the late sugar fix. Anxious to play with the the water chem adds. Good on ya!
Shared inventory is high on my list and I’ve started working on the code to do this. I was just not able to finish all of the changes in time for this release.
Thanks so much for the Water Tool and pH improvements.One thing that many brewers asked for is a way to distinguish between different versions of the same beer. You can duplicate a recipe, but I don’t believe you can cycle through different attempts at the same recipe? I would dearly like to compare mash performance on different brew days where I tweaked temps, pH etc. I also add extensive notes and I append the last incremental note with a new one and a date, so I have one fairly long note that builds up and it would be great to simply Export All Versions into Excel and compare, graph, etc.
Thanks for these updates though, great stuff!
Thanks Brad, you continue to outdo yourself with changes to BeerSmith. Amazing software that was already indispensable is now even more useful than before. Keep up the great work with the software and your blog/podcast, much appreciated.
Thanks!
What I do is brew a recipe, keep track of it in the recipe notes and “actuals” fields, then use the Copy to Brew Log button to save a copy of the recipe
to my brew log. Next time I brew I will bump the version number and brew date to match the new date and record again, then copy to brew log.
This way my brew log folder contains a list of all recipes “as brewed” and has dates and version numbers.
Love it. Great to see continuous updates happening. Cheers Brad. I just think Beersmith is awesome!
Hey !, Brad, when we BeerSmith in the Spanish version . We are anxiously awaiting the update!
Best regards! from Mar del Plata, Buenos Aires, Argentina!
All of the volunteer translation efforts for BeerSmith including tools are located here:
http://www.beersmith.com/forum/index.php/board,24.0.html
I’ve offered to package the results into a single download once a language is complete
(program lang.xml plus data files).
The changes to the whirlpool bitterness calculations are great, though I don’t think they’re quite complete (unless of course I’m doing something wrong). With version 2.3 with whirlpool bitterness corrections enabled (say, for 15 minutes of whirlpool), boil additions set to 0 minutes still give 0 IBUs, despite still being in the wort for the whirlpool. Setting 0 minute additions to 1 minute give full whirlpool contribution, however.
Is it possible to also apply the whirlpool contribution to 0 minute boil additions? For some of my recipes, there is a 30-50IBU difference, so this missing is significant. Thanks for your time, I really appreciate the update.
There is a bug affecting ONLY hops with zero minute boils. I’ll have it patched in the next patch in a week or two. If you set the boil time to 1 minute or just add the hops as a full length whirlpool it is handled correctly.
Minor suggestion on the update – If possible, don’t update the modification time shown on the cloud folder if you are just toggling the lock/unlock for the recipe. Alternatively (probably easier) is to add the same Date field on the cloud folder view that is on the design view of the recipe to the column choices .
Thanks for the update!
Echo Krys Beal’s appreciation of update. Particularly excited about the Sessions tab and the way actual reading are incorporated and graphed. Thank you very much for your work,
Any chance you can add a commercial brewers log book for tracking batch aspects such dated ferm temps and notes (D-rest, added dry hops, dumped cone- rather than just using the notes field?
This way we’d be able to create a report at the end of each batch for tracking
Many thanks
Thanks for the update! I love the software and use it exclusively.
For some reason the style guidelines default to BJCP 2008 – even though I’ve got it set as 2015 in preferences. (running a Mac desktop)
And, where can I add/customize the “steps” for a particular recipe?
Keep up the great work.
Did you go to Preferences->Brewing and set it there? This should change the Profiles->Style listing to be the BJCP 2015 style guide. It won’t change existing recipes however.
Great update thanks heaps.
A question for all… For a no chill brew straight to cube after flame out, does anyone have an estimate of the whirlpool time to put in…
Cheers!
Yes sir. I set it there and in new recipes it defaults to “BJCP 1999.” In existing recipes it shows “BJCP 2008.” Strange.
Each recipe has a copy of its entire style guide “as brewed”. So updating the style guide displayed does not update existing recipes. You would not want to update them automatically as all of the category numbers and titles have changed in any case. Older recipes will maintain the old style guide they were created under which may be the 1999, 2008 or new 2016 guide.
Use the time the cube is above 85 C (which is probably not terribly long) as the whirlpool time.
It would be nice to see support for the Grainfather as well. Especially for Mashing.
Hi,
I have been having a few dramas on the new update. Some previous recipes IBU’s have dropped to 0 and no matter what they don’t come back up. I am using the software for commercial brewing so maybe its a volume issue, not sure. Any thoughts?
Not sure – but in most cases 0 IBUs is indicative of a bad equipment parameter. If you want to export the recipe to a BSMX and email it to me at beersmith at beersmith.com I can take a look at it!
The killer upgrade for me would be for the mash pH to be estimated based on salt and acid additions and starting water profile rather than finished water profile alone. Currently, I am using a third party spreadsheet for estimating my mash pH, which is a little tedious when tweaking a recipe. Also a finished water profile based on additions for the mash and different additions for the sparge is a must.
I don’t know if BeerSmith does this already but it would be great if BeerSmith could calculate mash efficiency for batch sparging based on mash and sparge volumes.
In my comment above, starting water profile = base profile and finished water profile = target profile in BeerSmith lingo, but I usually do not target a water profile so much as I target a mash pH and then tweak my flavor salts.
Thanks for the updates! I followed the directions you posted for the new BJCP but I still only get BJCP 2008, AABC 2010, All Style Guides, and FADOL 2007. Any other suggestions?
For existing users it does not replace the existing style file, so you will need to download the BJCP add-on from File->Add-ons->Add. Once you have the new one installed you also need to go to Options->Brewing and set the style guide to the 2015 style guide.
I just went to look and see if there was a place to import CSV data for fermentations. BeerSmith allows you to add points individualy and export them when through, but NO IMPORT… whats up with that
I’m working on it – thanks!
It would be helpful if we could do the fermentation readings in the mobile version.
Fantastic work, thanks for your continued efforts to further improve this already awesome software.
Brad,
I know this is not a cloud based system, but I would love to install a second copy on my laptop and be able to sync the records. Maybe you could host just the data files for export with a password?
Case in point, I am working away from my home PC and I want to look up my recipe file and tweek one of the files.
Right now I can only look on my cloud recipes and if it’s not there I wait 2 weeks until I get back home.
Keep up the great work though. I personally could not do this without you.
Hi,
I just updated from Beersmith 2.0 to 2.3.7 and I noticed that one of my recipes changed the estimated OG and estimated preboil gravity. It’s an American Stout and changed from an estimated OG of 1.063 to 1.055. Any ideas why?
Rawley
Brad, What is the difference between “Measure Post Mash Gravity” and “Measure Pre-Boil Gravity”? I see you have them as different fields.
Thanks!
*Measured*
I have a question about the mash schedule relating to FG prediction.
I brew a Bohemian Pilsner recipe quite regularly, using a Hochkurz mash schedule which is basically the BIAB Pilsner step mash profile without the first two steps included in it.
When I select that step mash profile and delete the first two steps, the predicted FG stays at about 1.008 (which is what I get in reality), but when I change the 72C step to 71C, the predicted FG jumps to 1.016. Why?
Brad,
Does v2.3 operate on Windows RT 8.1? have a Surface and would like to use that in my brew room as opposed to running to my desktop during brew session.
No – it won’t operate on an RT system. You have to have an intel based processor surface – sorry.
Brad
Brad,
1. Will you ever be incorporating a multiple step up starter tool?
2. Will you ever be incorporating a multiple step up starter tool with the use of more than one stir plate?
The reason I ask question 1 is:
If I conduct a multiple step up yeast starter, the yeast cells obtained from the first step are provided in the software, simply by entering in data. If I conduct a second step up starter, I have to manually increase the number of yeast packs used and adjust the yeast viability of the packs to get the software to calculate the same amount of cells provided in the calculation of the first step. Once I have this value, I can enter the starter volume of the second step up starter and the yeast count from both steps is calculated. This is my work around for a step up starter in 1 container.
The reason I ask question 2 is:
If I conduct a multiple step up starter in more than one container, the process above is more tedious.
If using two flasks and two stir plates, like I like to do, based off the same process of question 1, I am forced to do the following. I enter in the yeast data in the software. This gives me the total yeast cell count, say 150 billion cells. I then manually calculate the yeast cells for half of that value (75 billion), manually adjust the number of yeast packs and then adjust the yeast viability in the software to get the same amount of cells provided (75 billion). Once I have this value, I can enter the starter volume size and I receive a yeast count from the step up, say (200 billion). I then multiply that number by two and get the total cell count from a step up starter from 2 containers (400 billion). This is my work around for a step up starter in 2 containers.
Thanks,
Dan
Yes Dan – a multi-step starter tool is on my “to do” list.
Brad,
I currently use a custom spreadsheet for recipes. It allows me to separate my mash and post-mash profile. This enables me to tweak to a Ph for mash and then potentially add additional salts to get a target chloride-to-sulfate ratio in the final water profile. In my trial, I couldn’t figure out a way to do this. Is there a way to do it?
Thanks
Steve
Yes – the new mash pH tools are outlined here: http://beersmith.com/blog/2016/08/10/using-the-new-brewing-water-and-mash-ph-tools-in-beersmith-2-3/
We are a group of 25 persons that has got together to build a brewery. We would like to have access and login to beersmith using same username, but different password. Is that possible? Can we have an egreement by having 25 users on the same account??
No – you could set up one account but it would be the same password and all would potentially have access to delete/edit/add things.
For the life of me, I don’t get some things on this program. I’m in Mash Profiles, and I’m creating a profile. I try to change either the water or the water/grist ratio to a full number (22 lbs of grain, 55 qts or 2.5 qts/lb), and it always ends up on 55.04 qts. WTF? Why won’t this stay at 55? Also, when I try to step up in temp, it always tells me to add 0.01 or -0.01 qts…not just 0.00. Bizarre glitch in the program, and although small, it drives me nuts.
Hi Brad,
I have brewed for years but am retired so trying to up-skill (old dog, new tricks?0. I am not too computer savvy and have swapped my 3 vessel system for a Braumeister. Anyhow, I have created an equipment profile in the Beersmith I bought and it is quite exciting re-sizing batches and learning to crawl with this incredible programme. Because the colour in my own Boatbuilder Bitter recipe did not look right (in reality my beer is quite a bit darker), I added my own photograph in my recipe which it allowed me to do. However, when I uploaded the recipe to the cloud my photograph did not go with it and the default lighter coloured picture was attached. Can I alter that somehow?
{ 2 trackbacks }