

Blichmann BrewEasy Electric
This week I take a up-close and personal look at the BrewEasy electric “turn-key” brewing system from Blichmann Engineering. For several years now friends have been pushing me to give up my ancient pot and igloo cooler for an electric system – so in part one I cover unpacking, setup and first impressions, and in part two I will discuss brewing on the system. [Note – this is a long post – and full disclosure: Blichmann Engineering is a supporter of the BeerSmith podcast and websites, and affilitate links are used in this article]
My Old Brewing Setup
Regular readers may have noticed that I don’t post many equipment reviews. That’s because I’ve been brewing on essentially the same 5 gallon setup since the early 1990’s. It consisted of two 10 gallon (38 l) pots for hot liquor and boiling, a 5 gallon (19 l) igloo cooler, a very old propane burner and several glass carboys. I also have a Barley Crusher malt mill and some kegs. With the exception of adding a large grain bag for BIAB several years back, and one smaller pot I used for stove-top BIAB or extract batches, the system has not changed in years.
Several factors came together to make me consider a new system. First, I wanted to go electric to be able to brew inside when it is too cold or hot to brew outside. Second I wanted a bit more automation after having brewed on three tier systems with friends. Third I was thinking of a larger 10 gal (38 l finish volume) setup since it is about the same amount of effort to brew 10 gallons as 5 gallons. Finally I wanted something compact – as the dedicated space I have in my basement for brewing is limited.
The Search for a New System

Boil Coil and Anvil Hop Strainer
I know some people believe Blichmann equipment is expensive, but if you compare turnkey 10 gallon (38 l) brewing systems, the BrewEasy is actually competitively priced. The list price for the 10 gallon electric BrewEasy setup is $2,263 at the time I’m writing this. Three tier semi-automated electric systems often run twice the price or more, with many reaching the $6K range, and also require a lot of space that I don’t have for an indoor system. Even the much smaller fully automated Picobrew Zymatic system – which is literally a push button system (2.5 gal batches) runs almost $2K.
Spidel makes a single vessel Braumeister 50l system (essentially a single vessel BIAB style setup) in the correct size, but it is almost the same price as the BrewEasy here in the US. It is a bit more compact, but the BrewEasy seemed more flexible to me with the Tower of Power controller, 20 gallon boil pot (75 l), 5,000 watt (vs 3200 watt) heating element, separate mash tun and March pump which can be used for a variety of tasks. I also liked the idea that components could potentially be reused later if I decided to reconfigure or expand my brewing system.
Brewmometer and Kettle Adapter
I looked at piecing my own system together, and it initially seemed promising but as you start to add up the price of the parts needed for a full system it gets expensive. The fact that Blichmann equipment is designed to last a lifetime, is made in the USA, and has been a supporter of BeerSmith certainly helped sway my decision.
The Blichmann BrewEasy Turnkey System
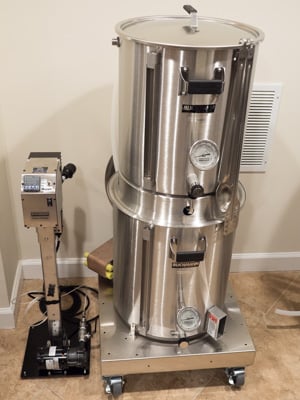
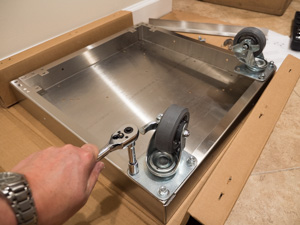
The BrewEasy is a compact, Kettle-RIMS (K-RIMS) system using two kettles stacked on top of each other. The 10 gallon (40 l) system I picked is really quite compact for a semi-automated recirculating mash system, with a footprint that is under 2 x 2 feet (60 x 60 cm) for the brewing unit and less than 12″ x 12″ (30 x 30c m) footprint for the Tower of Power LTE controller. It comes in a 5 gal (19l), 10 gal (40l) and 20 gal (80l) size, which refers to the finished batch size, and has both electric and gas heated versions. My electric 10 gal (38 l) system is 50″ (127 cm) high sitting on the KettleKart, so it is easy to access and mix grains in the mash tun.
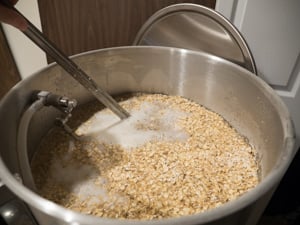
Mashing In
Operation is very simple. The mash kettle sits on top of the boil kettle using an adapter. You add water to both kettles, and the pump recirculates water from the bottom boil kettle back to the top of the upper mash kettle. A tube drains wort from the bottom of the mash kettle back into the boil kettle using gravity. Heating is done by the electric coil in the boil kettle. The control system throttles the heating element to maintain a set temperature for the mash.
The system is essentially a two vessel RIMS system, but it uses the boil kettle as the heating source. Once the mash is complete, you just let the remaining wort drain into the bottom kettle, then remove the mash tun and adapter and start boiling. When you are done, the March pump makes quick work of transferring wort to the fermenter. The basic system does not include a chiller, but I added a separate Blichmann Therminator plate chiller.
Here are the major components that were included with my 10 gal electric turnkey BrewEasy system:

Mash Tun False Bottom
- 15 gal (56.8 l) G2 Mash Kettle with false bottom and auto-sparge arm
- 20 gal (75.7 l) G2 Boil Kettle, pre-drilled for the heating element
- BrewEasy kettle adapter, silicone tubing and connectors for system
- Tower of Power LTE electric control system with a March 815 pump
- 5,000 watt electric Boil Coil heating element
Optional items not included that I added:
- KettleKart – stainless steel cart to hold the pot assembly, make it easy to move the system
- Blichmann Therminator and back-flush hose – plate chiller
- Thrumometer from Blichmann – An inline thermometer to measure output temp from the plate chiller
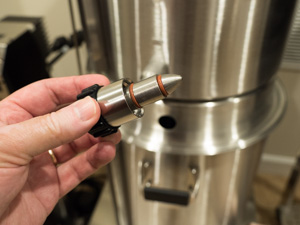
- Anvil Kettle Strainer – to prevent hops from getting into my Therminator
- Anvil Oxygenation Wand and Regulator – To aerate wort after brewing (love this thing)
A Quick Story on Blichmann Durability
Before my system arrived I walked into a local nano-brewery that a friend owns and I noticed they were brewing on three Blichmann 1 barrel (55 gallon/200 l) electric pots – a simple three tier system with pumps. Out of curiosity I asked them how long they had been brewing on it and they told me they had brewed just about every day for the last three years. The only problem they could enumerate was a temperature sensor that occasionally came loose. That comes out to roughly 800 batches of beer, excluding holidays – likely more than I’ll be able to brew in a lifetime.
 Unpacking and Setup
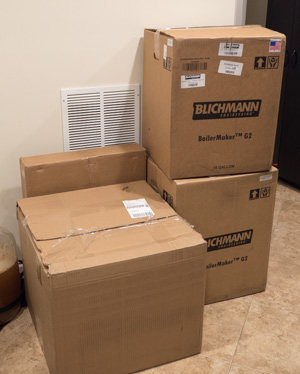
My BrewEasy arrived in four large boxes – one for each of the G2 kettles, one containing the optional KettleKart and a final box containing the Tower of Power, Boil Coil, auto-sparge arm, and various tubing and accessories. Every major piece came in its own box and was very well packed, and it all came through without a scratch.
Unpacking and setting up the system does take a few hours, but certainly is less time than assembling a comparable three tier semi-automated system. Each major component comes with its own instruction manual, which is both a blessing and a curse. On the positive side, the manuals contain detailed information on exactly how to assemble, disassemble, adjust and clean each component. On the negative side, it did take about 5 hours to completely digest all of the instructions and assemble everything. Overall a small price to pay for a system that will likely last a lifetime.
 The instructions were clear and well illustrated. At no point was I confused about which part went where or how to assemble anything. I was very pleased that Blichmann included all of the hardware needed – even small allen wrenches and brushes should you ever need to disassemble and clean the sight-glass on the kettles. They clearly thought through every detail.
It took a few hours to give it all a thorough cleaning though I admit the components were much cleaner than other “new” stainless equipment I’ve seen, and really did not have much manufacturing residue or oil on them. I cleaned the major components with Bar Keeper’s Friend and used PBW and star-san on smaller parts. I rinsed thoroughly with hot water to remove any residue.
First Impressions

G2 Kettle
I had a pretty high opinion of Blichmann equipment before – having seen it in person at Homebrewcon for years. I opened the G2 kettles up first, and I was surprised at the weight of these things. Though I had seen them before, I never bothered to actually pick one up – the mash tun with false bottom weighed in over 23 lbs (10.5 kg) and boil pot with coil was over 27 lbs (12.3 kg). They make my old kettles look positively wimpy in comparison. They have robust handles riveted in place (though no seam on the interior), and a pre-installed sight-glass on the side which makes it simple to gauge volumes. The sight glass is marked in gallons but you can flip it over to read in liters if you like. The kettles and adapter have a brushed finish which is attractive but does not reflect every fingerprint you put on it.
Linear Flow Control Valve
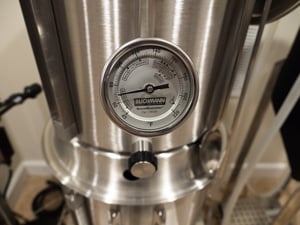
They have Blichmann’s linear control valve which gives you much finer flow control than a ball or butterfly valve with plastic handles so you can operate them while hot. I had read some posts criticizing the linear valve vs. a traditional ball valve because it takes three full turns to open the valve but I actually love the linear valve as it gave me very precise flow control when adjusting recirculation during the mash. You can remove the valve by just unscrewing it so it is very easy to clean or air dry after each brew. Each kettle has an adjustable “BrewMometer” in front, and the kettle lid can be hung over the lip of the kettle using its handle which is one of those nice details I appreciate. My boil kettle came pre-drilled for the boil coil heater and thermometer and the mash kettle was pre-drilled for the sparge arm (and thermometer), which made assembly very easy.
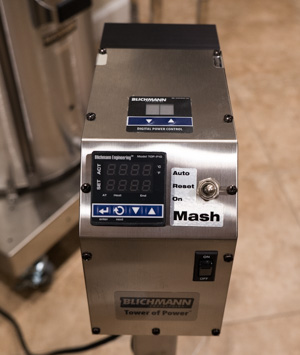
Control Panel
The Tower of Power LTE is a great little unit that lets you control the electric boil coil as well as the K-RIMS mash system. The display on top of the unit controls power to the boil coil, and you set the power level as percentage when heating to get a smooth rolling boil. On the front of the unit is the mash temperature control PID where you can set the desired mash temperature and monitor the temperature sensor installed in the recirculating pump. When operating in mash mode the PID also controls the heating element to maintain your mash temperature within a degree or so. On the backside there is a 120V GFCI outlet box which also has a switch controlling the standard March 815 wort pump, as well as the connectors for the 240V boil coil. The pump is mounted at the bottom of the tower of power. The pump has the polysulfite head, but Chugger makes a stainless steel replacement head for under $60 that fits the March 815/809 pumps if you decide you need the metal head later.
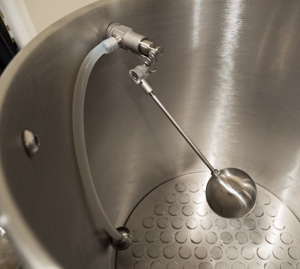
Auto-Sparge Arm
The auto-sparge arm is installed at the top of the mash kettle and has a float arm tied to a valve. You set the float to be at your desired mash volume and the valve will throttle the flow coming from the recirculating mash pump so you maintain a constant level of water in the mash tun to keep the grain bed floating without overfilling the kettle. At the bottom of the mash tun valve you can also install included flow washers that restrict the flow coming from the mash tun so your mash tun does not run dry. For the 10 gallon system, John recommended I use the 1.25 rate flow washer.
All of the miscellaneous hardware, connectors and 1/2″ silicone tubing was included. The hose connectors are a simple screw-on 1/2″ NPT but the Blichmann ones are stainless and have a plastic sleeve so you don’t burn your hand when attaching/removing them. Because of the design of the system you really only need to move the mash recirculation hose to your chiller while brewing, so you don’t have to handle a lot of hot hoses while brewing.

Therminator Chiller
The optional items from Blichmann were also very high quality. The KettleKart is heavy weight stainless steel and makes the entire unit easy to move around or park. It also holds the hot boil kettle while brewing so its not sitting on the floor! The Therminator is widely known as one of the best plate chillers in the business, and came with two Blichmann NPT connectors. It is surprisingly heavy, but also compact and I’ve been able to chill 10 gal (38 l) in just over 10 minutes while transferring directly to my fermenter.
Overall Impression
Standing in front of the complete BrewEasy system after it has been assembled, I really feel that this thing was built to last a lifetime. Its a stainless work of brewing art. Sure I might need to replace a rubber O-ring or silicone hose in 10-15 years, but almost every piece of the BrewEasy is heavy stainless steel and even the fittings, valves and attachments are very robust.
Now that it’s all set up there is only one thing left to do – brew! In part 2 of this review (next week) I’ll cover my first brew day with the BrewEasy including setup, brewing and of course lessons learned. Thanks for joining me on the BeerSmith Home Brewing Blog. Be sure to sign up for my newsletter or my podcast (also on itunes…and youtube…and streaming radio station) for more great tips on homebrewing.
[Full Disclosure: Blichmann Engineering is a sponsor of the BeerSmith podcast and web sites]
Related Beer Brewing Articles from BeerSmith:
- Blichmann BrewEasy RIMS Brewing System Review Part 2 – Brewing Beer
- Beer Brewing Pumps Part 2 – The Blichmann RipTide Pump
- RIMS and HERMS – Recirculating Infusion Mash Systems for Beer
- Planning an Indoor Electric Brewery – Part 1 – Electrical Considerations
- Anvil Kettle Strainer Review – Separating Hops and Trub
- Planning an Indoor Electric Brewery – Part 2 – Ventilation and Airflow
- SS Brewtech Brewmaster Chronicle 14 gal Conical Fermenter Review – Part 1: First Impressions
- SS Brewtech Brewmaster Chronicle 14 gal Conical Fermenter Review – Part 2: Fermenting Beer
Don't make another bad batch of beer! Give BeerSmith a try - you'll brew your best beer ever.
Download a free 21 day trial of BeerSmith now

{ 9 comments… read them below or add one }
Thanks for doing this write up. I have always been interested in this system. I would love to know how the anvil filter works for you? I currently use my biab bag for my hops but I have been debating between this anvil strainer our the trub trapper from morebeer
So far I’m very impressed with it. I’ve only done one batch so far, but I had a fair amount of trub from coriander and orange peel and it did a good job of filtering out all of the large particles. It certainly works better than other devices I’ve tried. When I backflushed the therminator after brewing it flushed out very clean.
I’ve had a BrewEasy for about a year, the system works as advertised and clean up is really easy with the valves. Being able to remove the valve ensures I keep it clean. I found that I didn’t need to go 10 degrees above my mash temp prior to adding grain. The BrewEasy maintains the temperature very easily and the Tower of Power just plain works. I love being able to pump into the fermenter and with the Therminator and inline thermometer to control wort temperature. The only problem I have is low efficiency (65%), with my old system I averaged ~75% with a gas tower system. I love this system and as I can brew 10 gallons at a time there is less brews than on my 5 gallon system – I’ll figure this out.
Oh, I have the Terminator and after cleaning and flushing out, I put the Terminator in the oven at 300 degrees for 2 hours to ensure the unit is dry and sanitized.
I agree it is an amazing system. I also have been getting about 65-67% efficiency on mine so far, but that only works out to about 2 lbs (1 kg) extra grain for an average 10 gallon (38 l) batch (versus a 70% system) which is OK with me. An extra 2lbs of grain is relatively cheap compared to the time spent brewing or even the total cost of a 10 gal (38 l) batch.
Thanks for the great review, I too have been looking at this system. I’ve been extract brewing for a long time and want to
switch to all grain. This system looks like a great step in that direction versus spending the money on a lesser system and
upgrading to something like this later down the road. Would you agree with that?
Yes – what I like about the system also is the fact that you could potentially reuse the kettles, pump and temperature control in a different configuration if you wanted to upgrade or change it later, though I personally like the compact size of the BrewEasy.
Great write up, looking forward to the follow up after having had it for a bit. Looking to step up to all grain in the near future. Last summer I purchased a 15 gallon brew pot ( big upgrade from my previous pot from my original kit) that can be used as the mash tun in this set up later down the road. As for the two version of electric, is there a disadvantage of going with 110? I could always do w/out my oven on brew day, but thought I would ask.
The 10 gal (38 l) BrewEasy actually has a 20 gallon boil pot and 5000 watt boil coil which requires 240V. If you went with the smaller BrewEasy 5 gal (19 l) setup I believe it has the option of 120 V or 240 V and operates at a lower wattage of 2250 watts for the 120 V system. I’ve not tried the smaller system myself, but I imagine it would be adequate for 5 gallon (19l) finished batches. However the larger BrewEasy which is boiling probably 14 gallons of water does require a 240 volt GFCI circuit.
Hi Brad Smith,
Thanks for sharing this article, it’s very useful to do brews beer & Wine making in Winnipeg easily.
{ 4 trackbacks }