

Young Cider from a Keg
I’ve never been a big cider fan, but a friend sent me a recipe he said I must try, so I made my first batch and it actually came out great! I thought I would share the recipe and method with you so you can give it a try. This is a simple recipe made from apple juice, though you can certainly use fresh pressed cider if you have access to it.
Cider Making Equipment
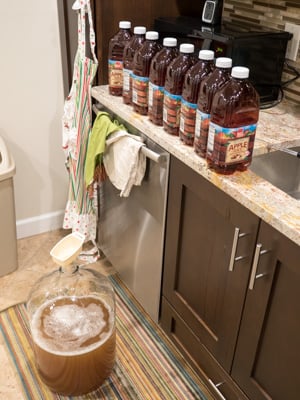
Most home brewers have what’s needed to make cider on hand. Here’s what I used for a 5 gallon (38 l) batch:
- Large carboy (6.5 gal or 43 l) and airlock
- Transfer siphon and tube, funnel
- Aeration wand and oxygen (works best) or alternately you can use an aquarium pump or just shake the carboy to aerate
- Keg system
I do not recommend bottling this cider as we will be back-sweetening it, so if you were to bottle you run the risk of fermentation starting again and creating bottle bombs. This recipe works best with a keg system such as Cornelius kegs that let you reduce pressure if fermentation starts again.
Juice and Cider Making
Easy Cider Recipe
Here’s what I used to make the cider. The recipe was provided by Nathan McBride who attended a Craft Beer retreat with me:
- 2 lbs (1 kg) Brown Sugar
- 4 gal (15 l) of 100% Apple Juice (no preservatives!)
- White Labs Cream Ale Yeast (WLP080)
- Diamonium Phosphate (DAP) Yeast Nutrient – staggered into 3 x 1 tsp additions
- 3-4 Containers Apple Juice Frozen Concentrate (for backsweetening, each would make 2 quarts (2 l) of apple juice if water was added)
- 2 tsp Pectic Enzyme (fermentation)
- 1 tsp Vanilla Extract (at kegging)
- 2 Cinnamon Sticks (kegging)
- 1/4 tsp Nutmeg (kegging)
- 1/4 tsp Allspice (kegging)
- 1/4 to 1/2 tsp of Potassium Metabisulfite (see instructions)
- 2.5 tsp of Potassium Sorbate (see instructions)

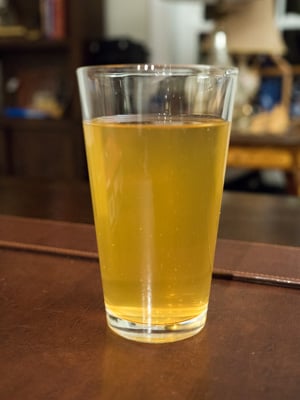
Pouring the Apple Juice
Steps for Making the Cider
- Boil 2lb (1 kg) of Brown Sugar in 2 quarts (2 l) of water to sterilize it, then cover and chill slightly
- In large 6+ gal sanitized carboy, add four gal (15 l) of apple juice. Make sure the apple juice has no preservatives such as sulfites or sorbates which will inhibit fermentation. Sanitize the tops of the apple juice before opening/pouring.
- Add brown sugar mixture to the carboy, then top carboy up to a bit over 5 gallons (19 l)
- Add 1 tsp of DAP yeast nutrient, 2 tsp of Pectic Enzyme and aerate cider (I used pure oxygen) or you can shake it or use an aquarium pump to add some oxygen to the mixture.
- Pitch the yeast into the mixture at 70F, and seal it with the airlock. The original gravity should be around 1.048
- Within 24 hours you should see some active fermentation. Add 1 tsp of DAP yeast nutrient at 24 hours.
- Add one final 1 tsp dose of DAP at 72 hours (3 days) and allow it to ferment out for at least 10 days. Mine took a bit over 14 days to complete fermentation. You may get some sulfur odors from the yeast – this is normal.
- Rack the cider into a keg, leaving at least 2 quarts (2 l) of headspace in the keg so you can back sweeten it.
- When racking, add 1/4 tsp (to 1/2 tsp) of Potassium Metabisilfite which will inhibit remaining yeast. Purge air from the keg and cold crash the cider in a refrigerator. My final gravity came in at 1.007 before backsweetening for an alcohol content of 5.5%.
- After another 12 hours, add 2.5 tsp of Potassium Sorbate which will also inhibit yeast growth. You want to wait until you have some sulfite in the cider before you add the sorbates or you run the risk of a “geranium” (gerinol) off flavor. Return the keg to the fridge for conditioning.
- After at least three days, the yeast should be rendered inert, and you can backsweeten. Now add the two spices, Vanilla extract, and cinnamon sticks. Finally add 3-4 containers of apple juice concentrate. Each container should make (if mixed with water) 2 quarts (2 l) of apple juice, though we’re not mixing them with water here – just adding the concentrate directly to the keg. I prefer 3 containers, but if you like really sweet cider you can use 4 containers.
- If you want to clear the cider more quickly you can use Super-Kleer at this point. This is a two part clarifier and it works quite well.
- Seal and purge the keg one final time, then return it to your keg fridge and put it under pressure to begin carbonating it. I server my cider fully carbonated at roughly 2.5 volumes, just like my beer.
- If you can wait, the cider will reach peak flavor in another 3-4 weeks. There is an initial sharp flavor that will fade over time and also the spices will settle and smooth out over time.
Again, I recommend kegging the cider and not bottling it as there is always the risk of fermentation starting again and over-pressuring your bottles.
The Verdict
I was not a big cider fan, but that has changed now. I actually really enjoy this cider! Its not overly sweet, but its also not dry like plain fermented apple juice. It is surprisingly clean and drinkable, and is light enough to be enjoyed by non-cider drinkers. The spices which come through strong at first will mellow with age and add a nice counterpoint to the dry alcohol and sweet juice addition.
Variations
Once you have the base recipe down there are a ton of potential variations. For a strong winter cider you can add more brown sugar to up the alcohol content, and also increase the holiday spices to add more of a holiday finish to the cider. Fruit is also a great addition. You can add fruit to the fermenter or add it when backsweetening. Non-apple fruit juice concentrate is another great addition. Finally you can vary the yeast used or base apple juice used for varying effects.
I spoke with Marshall from Brulosophy and he recommended a 3-4lb bag of frozen mixed berries or frozen tart cherries from Costco. He lets them thaw overnight, then squishes them up in the bag and adds the contents directly to the primary after primary fermentation has completed. He then lets it ferment for an additional week before adding the sulfites/sorbates and backsweetening. He says that the fruit adds a nice fruity hint to the finished cider. I may give this a try on my next batch.
Update – Tart Cherry Juice Variant
I just finished another batch using tart cherry juice. This time I fermented three weeks, then racked to a secondary where I added 2 quarts of tart cherry juice and let it ferment out again for another 4-5 days. Then I added the sulfites, followed by the sorbates (12 hours later) and finally some Super Kleer and gave it another 4 days to stabilize and clear up. Finally I kegged it after first adding only 2-1/2 cans of Apple concentrate and another 1.5 quarts of tart cherry for backsweetening. If you add these in small increments you can adjust the proportions to suit your own preferred tastes. I added 1/2 tsp (or up to 1 tsp to taste) of vanilla to smooth out some of the tartness but left out the other spices (no nutmeg/cinnamon or allspice) and kegged it.
Came out pretty darn good – the tart cherry and color shines through without dominating the flavor. Only problem was that I finished with about 6 gal of cider, so I had to put the extra cider in a growler temporarily until I can get it into a clean keg.
Have some great cider tips of your own? Leave a comment down below! Thanks for joining me on the BeerSmith Home Brewing Blog. Be sure to sign up for my newsletter or my podcast (also on itunes…and youtube…and streaming radio station) for more great tips on homebrewing.
Related Beer Brewing Articles from BeerSmith:
- How to Backsweeten Beer, Cider and Mead
- Brad’s Tart Cherry Mead – Mead Case Study
- Backsweetening Beer, Mead and Cider Using BeerSmith
- Working with Fruits in BeerSmith 3
- Spices and Flavor Extracts in Beer Brewing
- Brewing Fruit Beers at Home Part 1 of 2
- Brewing Fruit Beers at Home Part 2 of 2
- Acetaldehyde in Home Brewed Beer – The Green Apple Off-Flavor
Don't make another bad batch of beer! Give BeerSmith a try - you'll brew your best beer ever.
Download a free 21 day trial of BeerSmith now

{ 7 comments… read them below or add one }
I brew with Nathan who sent this recipe over, and use this recipe often as well. As you mentioned the non-apple juice or mixed juice concentrates work great for back sweetening. I’ve used cherry-apple and cran-apple concentrates with great success. The cherry-apple along with the spices makes a great fall cider.
I’m experimenting by fermenting a new batch with tart cherry juice – I’ll let you know how it turns out!
What a very pleasant tasting hard cider! I made the traditional apple cider following your receipt and it came out great! I’ll be doing this again and also experimenting with other fruits as you and others have suggested.
Thanks – I recently added the “Pectic enzyme” to the ingredient list which gets rid of the syrupy pectin from the fruit and leaves a cleaner finish on the cider – try it next time! The tart cherry version also came out great.
I’ve had great success too with cider. But what I do is remarkably simple. I buy 2 gallons of organic apple cider 1.050 (not fermented ); toss in a carboy and pitch 2/5 of a package of champagne yeast. I follow the same process as for beer and it gets to an acceptable 1.010. Prime with 30g of sugar and bottle. This is just too easy. Adding cinnamon sounds interesting.
Hey Brad – love the simplicity of the recipe. What temp did you ferment at? Thanks!
I liked how you mentioned that you should keg your hard cider to not over pressure your bottles. My brother is wanting to start a hard apple cider company and he was wondering how he could accurately store the liquid. I’ll be sure to tell him that he should use a keg to store his hard cider.