

 This week I take a look at the Brewmaster 14 gal (52 l) Chronical from SS BrewTech. In this first part I’ll cover my initial impressions after unboxing, assembling and cleaning the fermenter. In part 2, I’ll cover brewing and fermenting with the unit.
Do You Really Need a Stainless Conical for Home Brewing?
Lets start by admitting the facts here – you probably don’t need a shiny stainless conical fermenter to brew great homebrewed beer. The old glass or plastic carboy can get the job done. You also don’t need a $600 putter, or a shiny new car to get to work. But if you are a passionate brewer, conicals do have some advantages including more control over the process, temperature control, making collecting sediment and yeast easier, avoiding the need for a secondary transfer, and of course the ease of cleaning/maintaining stainless steel.
SS BrewTech Chronical Series Features
The SS Brewtech Chronical series is a set of stainless steel conical fermenters targeted for the home brewing and pilot brewing market. They come in four sizes: 7 gal (26.5 l), 14 gal (53 l), 1/2 barrel (17 gal/64 l) and 1 barrel (41 gal/155 l). That volume includes headspace, so you would buy a 7 gal fermenter for a 5 gal finished batch size, 14 gal for a 10 gal batch and so on. I bought a 14 gal/53 l setup from Great Fermentations (affiliate link) to go with my new 10 gal (38 l) Blichmann BrewEasy electric.
For each fermenter size, SS Brewtech offers two variants: a standard unit and a more expensive “Brewmaster” series. The fermenter itself is identical in both options, but the “Brewmaster” series includes additional features listed below as part of the base unit. SS Brewtech and many retailers also carry an array of accessories and fittings to go with the fermenters.
 Basic Chronical Fermenter Features
- Full 60 degree conical made from 304 stainless steel (food safe), etched volume lines on inside
- Two welded 1.5″ Triclover sanitary fittings for yeast dump and racking. Ball valves on the basic unit.
- 90 degree elbow and two 3-piece ball valves, one with an adjustable racking arm
- Weldless 1/4″ ID thermowell for measuring temperatures (digital thermometer is a separate purchase)
- Custom seal cover with 1.5″ triclover adapter for venting or pressurized transfer (to 5 psi)
The “BrewMaster Series” adds the following:
- Integrated 304 stainless steel coil for temperature control (temp control system sold separately)
- Sanitary 1.5″ triclover butterfly valves (upgrade from ball valves on basic version)
- 3/8″ Sampling valve for drawing small samples
- Neoprene insulation jacket to aid in temperature control
- Larger 3″ Triclover port in the cover to make dry hopping/fermentation additions easier
Chilling Coil – Brewmaster Edition
Temperature Control
One of the key features that led to me purchasing a SS Brewtech over another unit was their innovative temperature control system. The same limited space that led me to select a Blichmann BrewEasy electric, also meant that I really did not want to install a separate fermentation refrigerator. To be fair, a small used freezer and some carboys would have been cheaper.
The system requires a separate chill water source – such as a cooler with some ice water in it. It works by monitoring the temperature in the fermenter and running a small submersible pump when needed to pump cold water through the chilling coil. I used my old mash tun with some bottles of ice in it to provide the chilled water source. A separate heating pad is also available if you need both heating and chilling.
I plan to do a full review of the temperature control system later, but basically it works well for controlling ale fermentation temperatures within a degree or so if you remember to change the bottles of ice out in the cooler every 12-24 hours. Unfortunately it does not work well at lager temperatures unless you have a glycol chiller or serious source of chilled water like a separate refrigerator – the system simply absorbs too much heat for lagering with ice alone. However I’ve been able to operate mine at 65F (18 C) in my basement which is sufficient for many lager strains.
Racking from Stainless Fermenter
Pressurized Transfer
Another neat feature of having a sealed conical is that you can perform a CO2 pressurized transfer from the conical to a keg. So if you have a CO2 tank and keg system you can apply low pressure to the fermenter to force the beer into a CO2 purged keg, with the potential to complete the entire transfer without letting your beer contact air (or oxygen).
The BrewTech conicals are only rated to about 5 psi, so you need to keep the pressures very low during transfer, and the separate racking port on the conical lets you transfer beer without getting much (if any) sediment into the keg. Its not quite as simple as something like the new Blichmann Cornical which converts directly to a serving keg, but the Chronical’s pressurized transfer works fine in practice.
Unpacking, Setup and First Impressions
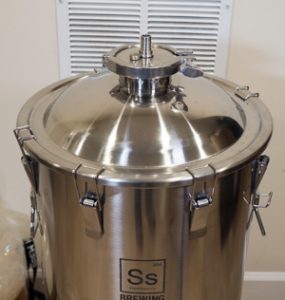
I purchased the Brewmaster Series 14 gal (50 l) conical from Great Fermentations (Affiliate link) to pair up with my Blichmann BrewEasy 10 gal (38 l) system. In practice I start with about 11 gallons of beer, so I can fill two 5 gallon kegs to the very top after losses from fermentation. The unit arrived very quickly, and appears to have been drop shipped from SS Brewtech.
 The box was about 40″ tall and contained the complete fermenter and accessories. The legs are already attached, as was the stainless chiller coil. A box near the bottom of the package had the valves, accessories and hardware in it. Initial setup consisted of screwing in the four feet, installing the weldless thermowell and sampling valve. After cleaning (see below) I also added the butterfly valves, elbow and racking tube.
I was very happy to see welded sanitary tri-clover fittings on the conical as well as high quality butterfly valves. These were all stainless and should provide a sanitary connection for pulling trub and yeast or racking. The butterfly valves are simply beautiful – solid and well made.
I was not as thrilled with the four weldless connections – two for the cooling coil, one for the thermowell and one for the sampling valve. Each had a thin 1/16″ (1 mm) by 16mm (approx) rubber O-ring on it, which provides the seal. Initially I tried putting the O-ring on the inside for each, but that failed for the sampling valve as the nut pushed it out of place. The O-ring will seal but only if you have it at just the right tension level and put the seal on the opposite side from the nut. SS Brewtech does have a small note on one of the instruction sheets regarding the use of a single seal. Even after I sorted it all out, I later had a leak around one of the coil fittings and had to quickly torque it down as wort spilled out on the floor. I would prefer a better system for sealing these up – perhaps a larger O-ring or rubber flat washer.

Accessories
The weldless O-ring fittings did eventually get properly seated and they worked well. Obviously if you are going to brew sour beers with this system you would want to change out the O-rings and also the tri-clover silicone seals to avoid contaminating any future batches via the seals. Also since the system is weldless you can remove and clean these seals periodically if needed.
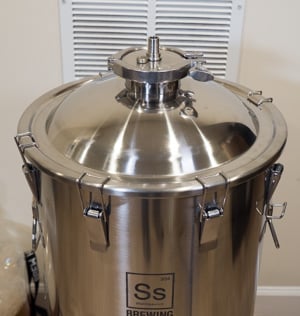
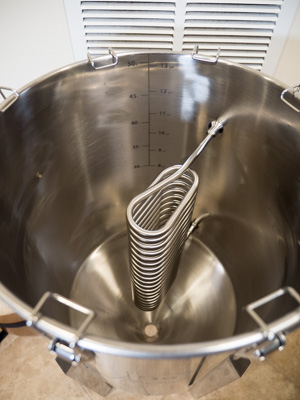
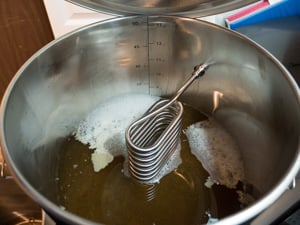
The fermenter itself was very nice. It has a polished stainless finish to it, has welded legs, and is laser etched on the inside with volume markings for easy reference while filling. The chilling coil is 100% stainless steel as well and located at the center of the fermenter close to the thermowell. The cover has a pressure gasket all the way around to provide a solid seal, but is fully removable which makes cleaning up after fermenting a breeze. The Brewmaster edition has a large 3″ triclamp fitting on the top which you can cover with an included 1/2″ hose adapter to allow blowoff during fermentation, but is also large enough to add ingredients or dry hop as needed. You can also fit it with a separate gas fitting for pressurized transfer.
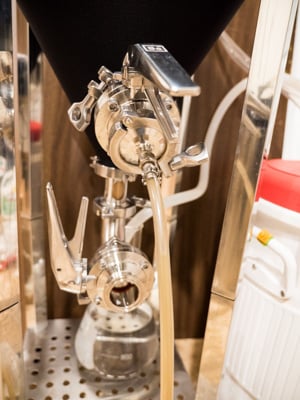
As expected the dump valve is at the bottom of the conical, and a 90 degree elbow and fittings are included to make it easy to collect yeast or trub. The upper racking valve has a separate racking arm on the inside of the fermenter which lets you collect wort easily during racking while minimizing sediment.
The thermowell is well positioned near the center of the fermenter, so you can monitor and control the temperature within the fermenter, which can be several degrees higher than the surface of the fermenter. The sampling valve (brewmaster edition) is also well positioned on the front of the fermenter and is very handy for taking small samples to check gravity or flavor during fermentation.
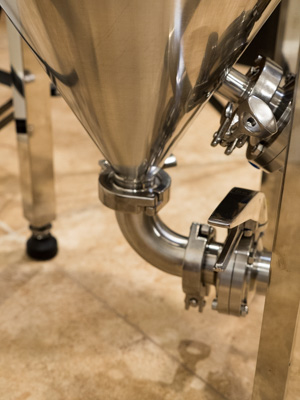
Racking and Dump Valves
The stainless steel chilling coil is right near the center of the fermenter, though its lowest point is a bit above the top of the conical. This is ideal for 10 gal (38 l) batches, but is probably situated too high to provide much temperature control if you want to do a 5 gallon (19 l) half batch. The Brewmaster edition also comes with a neoprene jacket which is about the same weight as a medium wetsuit (if you scuba dive) and fits very tightly over the fermenter. The jacket provides some basic insulation though obviously the top and fittings are not insulated at all.
The unit does sit very low to the ground with the standard legs, with the bottom dump valve only inches above the ground. You can purchase 10″ leg extensions separately, but even with the extensions the unit is not really tall enough to siphon directly into an average homebrew keg. Fortunately you can do a pressurized transfer though it requires purchase of a few extra fittings. It also has handles welded to the side, but the prospect of lifting the unit full of wort (at 100+ lbs) is probably a two man job.
Cleaning and Passivating
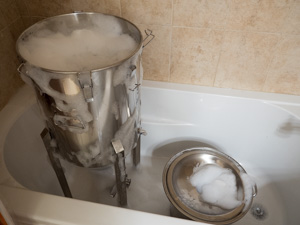
If you do research on the SS Brewtech units, you may find references to people who had flavor problems because they did not clean the unit properly before using it. The unit is imported from China and since it is polished stainless, there is quite a bit of residue left over from manufacturing and polishing. Honestly it is a bit of a pain and it took several hours to get it cleaned and passivated properly before brewing.
Passivating – Embrace the Foam!
My favorite method for quick cleaning/passivating stainless equipment is to use Bar Keeper’s Friend. Unfortunately this particular fermenter has laser etching on it, which Bar Keeper’s Friend is very good at removing – so that approach was a no-go!
The manufacturer recommended method is to use TSP (tri-sodium-phosphate) to clean it thoroughly followed by a super concentration of 1 oz/gallon of Starsan acid sanitizer. The Starsan is acidic and will remove the oxidation layer on the stainless. You then air-dry it after finishing with the Starsan and the oxygen from the air reacts with the chromium in the stainless steel to form a protective oxide layer over your newly cleaned equipment.
So that is exactly what I did – purchased a box of TSP, mixed it to the recommended concentration and then thoroughly (and aggressively) cleaned every inch of the fermenter and fittings. Then I mixed up a super concentration of Starsan (1 oz per gallon, which was a lot of Starsan for a 14 gallon fermenter!), and gave everything a good long soak followed by air-dry. After drying everything overnight I gave it all another extensive rinse to remove any residual acid.
Fortunately the regular cleaning routing after brewing is a lot less – I just use PBW for cleaning and honestly most of the fermentation debris rinses right off. I disassemble and clean the various valves and triclamp fittings also. Obviously you need to stanitize it before use – and the standard concentration of Starsan works fine for that.
Overall Impressions
Filling Fermenter
Once I got over the cleaning/passivating pain and figured out how to seat the weldless O-ring seals, my impression of the Brewtech Chronical (Affilliate link) has been very positive. I did purchase some additional accessories and brew several batches with the system – and had a great experience which I’ll cover in part 2 of this review.
While the Chronical does not quite have the fit or finish of my Blichmann stainless brewing equipment (arguably the gold standard) it does provide a nice balance of low price point and features and is easy to operate. The tri-clover welded fittings and butterfly valves are great. The temperature monitoring and control system worked well in practice, at least for ales. The all-stainless conical, chiller, and fittings should last an average home brewer a lifetime. Other features including the dump valve, racking arm, pressurized transfer, thermowell and even the sampling port all add value to the system.

Fermenting Beer – with Chiller
Note that I purchased the “Brewmaster” edition (aff link) which has the integrated chilling coil, more expensive butterfly (vs ball) valves, sampling port, insulation jacket and larger 3″ triclover port in the top. The standard edition (which costs quite a bit less) does not include these features, though you can still purchase a chilling system for it that is basically a replacement cover with the chilling coil installed. If you plan to use the chilling system and butterfly valves (which are more sanitary), the Brewmaster edition is probably a better buy.
Also some additional parts must be purchased separately – for example the actual chilling controller and pump is a separate purchase. Additional fittings to do a pressurized transfer are separate purchases, as are options like leg extensions, a sight glass, and others. Fortunately the standard tri-clover fittings can be bought from many suppliers.
Next week in part 2 of this review, I’ll brew some beer up and give you my thoughts after fermenting a few batches using the SS Brewtech Chronical. Thanks for joining me on the BeerSmith Home Brewing Blog. Be sure to sign up for my newsletter or my podcast (also on itunes…and youtube…and streaming radio station) for more great tips on homebrewing.
[Note: Affiliate links were used in this post. Use them if you want to support the BeerSmith web sites]
Related Beer Brewing Articles from BeerSmith:
- SS Brewtech Brewmaster Chronicle 14 gal Conical Fermenter Review – Part 2: Fermenting Beer
- Conical Fermenter Advantages for Home Brewing
- Camlock vs Tri-clover vs Blichmann vs Quick Connect NPT Fittings for Home Brewing
- Beer Brewing Pumps Part 2 – The Blichmann RipTide Pump
- Blichmann BrewEasy Electric Review – Part 1 – First Impressions
- Immersion, Plate and Counterflow Chillers for Home Brewed Beer
- Blichmann BrewEasy RIMS Brewing System Review Part 2 – Brewing Beer
- Beer Brewing Equipment with John Blichmann – BeerSmith Podcast 28
Don't make another bad batch of beer! Give BeerSmith a try - you'll brew your best beer ever.
Download a free 21 day trial of BeerSmith now

{ 10 comments… read them below or add one }
Love mine, but you are spot on about lagering temp – even with a 10 gallon reservoir of water in a freezer set at 34 F, the freezer couldn’t cool the water fast enough to maintain a 55 F lagering temp in a 65 F room. That was a little surprising. Works fantastic to stabilize temp as the yeast activity really ramps up though and the heating feature is great to raise a few degrees to for a rest at the end of the cycle.
Marshall over at Brulosophy has been doing some interesting experiments fermenting lagers in the mid 60’s F temperature range which I can easily reach with this fermenter, so I think I’m going to try brewing a Marzen next at about 64F or 65F fermentation temperature and see how it turns out!
Brad – super informative and balanced review thank you. Looks fantastic – I’d better start negotiating with Mrs talkingbeers :0) Would love a more detailed chat to you about it in coming months – after I get my website activated. I enjoy your podcast too Brad – really appreciate the effort and care you invest / keep it coming!
Hi Brad, Long time reader – first time caller. Great write up, so much so that it inspired me to buy one. You mentioned having trouble seating the weldless O-rings. In leak testing mine before use, i’ve found similar troubles and was curious if you had any advice on how best to seat them? I’ve got my O-rings installed on the correct sides of the fermenter as noted – but i think my tension is off. Did you find that more tension or less tension was a better approach (i.e. better to have a tight fit or a snug fit)? Also, did you find that the neoprene jacket interfered with the effectiveness of the weldless fittings in creating a good seal? I would say with confidence that the precut holes in the neoprene jacket i received are 90% accurate in terms of where they fall on the fermenter in relation to where the fittings line up – but there is a small amount of overlap that may be putting some unwanted torque of the fittings once they’ve been installed. Any advice you could give would be much appreciated! Thanks again for the great article.
Cheers,
Matt
For me the key was to put the rings on the side opposite the nut and then carefully torque it down until it stops leaking. The jacket worked OK for me but definitely seal the fittings and test it before you put the jacket on.
Thanks for the advice. I’ll give that a try tonight!
Cheers,
Matt
Great review. I bought the Chronical and use it in a tall brew fridge. I can happily lager down to 1-2C for 6 weeks with this system. The only downside over the Brewmaster series is that the valves need to be stripped down to clean and sanitise after every brew. All in all I am very happy with the system.
Any suggestions on how to achieve a decent cold crash when space is limited? My keezer would not fit one of these even if I tried.
Unfortunately if you want to get down near freezing the only options are to put the entire thing in a fridge or get a glycol chiller. The ice and cooler option simply does not have enough chilling power to get you down to that temperature.
Hello.
I’m from Albania and I want to buy a 65 liter brewing line.
{ 2 trackbacks }