-
 Welcome to the new forum! We upgraded our forum software with a host of new boards, capabilities and features. It is also more secure.
Jump in and join the conversation! You can learn more about the upgrade and new features here.
You are using an out of date browser. It may not display this or other websites correctly.
You should upgrade or use an alternative browser.
You should upgrade or use an alternative browser.
Washing Yeast
- Thread starter cgamble1521
- Start date
Scott Ickes
Grandmaster Brewer
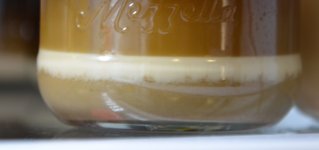
That is trub and hop material. You probably poured that one out last and got all the gunk at the bottom.
My procedure is to add preboiled and cooled (sterilized water) to the fermenter and swirl it around to mix it up really well.
Then I let it settle out. It should settle out into three distinct layers, with the top being water and beer, the middle being good yeast and the bottom darker layer being trub, hop material and other gunk.
Once it has settled out into those three distinct layer in your fermentor, pour the water/beer on top down the drain. When you start getting good yeast, pour it into a 2 quart canning jar (I use the canning jar that I had the boiled and cooled sterilized water in). Stop pouring before you get the dark gunky bottom layer.
Seal up the 2 quart canning jar and shake it up vigorously to completely blend everything. Then let it sit and settle out. It will settle out into the same three layers again. Except that this time, there will be a lot of water on top, good yeast in the middle and just a little bit of the darker gunk at the bottom.
I try to estimate the quantity of the yeast in that middle layer. For exampe, if it is about 1 pint, I'll take three previously sterilized pint canning jars that have sterilized water in them and will pour out 2/3rds of the water from each. Then I'll carefully open up the 2 quart canning jar. I pour the water/beer top layer down the drain and then pour the yeast into the three pint canning jars that are 2/3rds full of water. You'll be pouring about a 1/3rd of a pint of yeast into each canning jar. When filling the third jar, try not to get any of the bottom gunk into that canning jar. It doesn't matter if it isn't completely full. Seal up the three pint canning jars. Shake them up really well, label them ( I use the easy remove canning labels you can buy where you buy your canning jars), and then put them in your refrigerator. You may still notice just a little bit of gunk on the bottom of each one of these, but it's not that big of a deal. I usually have good, clean yeast with no gunky bottom layer after using the above procedure.
As for that jar that you have the trub in. It's not that big of a deal. You can get rid of it, if you want, but doing one more rinse of that yeast with another 1 pint canning jar of sterilized water.
Good luck. I've had great success using rinsed yeast.
An easier way to reuse yeast is to just make a larger starter than you need. Say you need a 1l starter, just make a 1.5L starter. Then cold crash, decant the liquid and pitch the yeast you need and save the rest. That way you're not trying to reuse potentially stressed yeast and you dont have to deal with washing it.
Just a thought for future batches.
Just a thought for future batches.
cgamble1521
Apprentice
It's easy to panic when trying something new! Thanks Scott for helping calm my nerves. I have re-rinsed and everything is clearing up just fine.
BrexMex41 - will definitely look at doing so in the future. Where were you a few weeks ago when I needed you")
BrexMex41 - will definitely look at doing so in the future. Where were you a few weeks ago when I needed you
tom_hampton
Grandmaster Brewer
- Joined
- Oct 8, 2011
- Messages
- 929
- Reaction score
- 0
Brewmex41 said:An easier way to reuse yeast is to just make a larger starter than you need. Say you need a 1l starter, just make a 1.5L starter. Then cold crash, decant the liquid and pitch the yeast you need and save the rest. That way you're not trying to reuse potentially stressed yeast and you dont have to deal with washing it.
Just a thought for future batches.
This method has problems, too. Growing as a starter and then being stored for a longer period of time is just as stressful (and perhaps MORE so) as growing in a beer and being re-used immediately. Similar, problems exist in both populations. However, the residual starter spends MORE time without nutrients, unless you continually regrow and feed the colony. Homegrown Slurry dies off at a rapid rate (10% per week).
So, while the above approach is probably less contaminated (simply due to less exposure), its viability and vitality will be significantly reduced due to the longer storage time without nutrients.
Scott has the right procedure, but rinsing yeast is not strictly necessary. It really depends on how much trub you get into your fermenter. If your transfer from your kettle is reasonably clean and leave most of the trub behind, then you don't really need to rinse. There is a contamination argument to be made, that there is a risk of the rinsing steps introducing more contaminants (wild yeasts or bacteria) which may cause more problems than the trub allegedly will.
I'm mostly a believer in this theory. Yeast handling should be minimized because every step exposes the yeast to the open air. My slurry is generally around 10% trub (when looking at the ratio of creamy white layer to brown ugly layer). I consider this to be below the threshold of being worth the risk of contamination.
What about harvesting yeast from a secondary? No boil kettle trub will be there.
Scott Ickes
Grandmaster Brewer
Beer_Tigger said:What about harvesting yeast from a secondary? No boil kettle trub will be there.
Here is John Palmers take on yeast harvesting in his book "How to Brew".
Simple Yeast Ranching
The only drawback to the above harvesting method is the contamination risk for the current batch. Experienced brewers with good sanitation practices can harvest yeast that way without much risk, but for newer brewers it is probably better to collect the yeast after the fermentation is complete. You can collect yeast from either the bottom of the primary or secondary fermentor. If you obtain yeast from the secondary, it will have only small amounts of trub mixed in and will be easy to seperate. However, you need ot be aware that if you repitch yeast harvested from the secondary several times in succession, you will tend to select the less flocculant cells of the population, and future beers will be slow to clarify. But, if you only repitch once or twice, it is not a big deal. I myself usually harvest yeast from the secondary.
If you harvest yeast from the primary fermentor, you will need to separate the yeast from all the trub that is mixed in. Professional brewers most often do this by "acid washing" the yeast--using acid to lower the pH to about 2.5 so that bacteria is inhibited and using whirlpool methods to seperate the heavier trub from the lighter yeast. But acid washing tends to inhibit the yeast too, and is not strictly necessary. You can simply use chilled boiled* water and two sanitized jars to separate the healthy yeast (white) away from the majority of the trub.
twhitaker
Grandmaster Brewer
I have found that timing is everything for reusing yeast. I have a primary which is a minipubs plastic 23 ltr fermentor with sediment traps, and a secondary glass carboy. I keep both full at all times. When its time to brew a new batch, that is the same time to transfer secondary contents to ball lock keg. I swirl the yeast sediment up from the carboy, with remaining beer and pour it into a sterilized ( with sulphite) one liter mason jar. There is no trub. I get about 1/2 jar. Then I transfer the primary contents into the cleaned and sterilized carboy. I dont get much trub in my primary; and I cant stand to pour that yeasty stuff down the drain, so I swirl that up and pour it into the mason jar until it is full. I seal and shake, and start my new brew. In a few hours I pitch that full mason jar into the new batch.
So, brewday is the day where everything is done at once, all transfers and yeast preparations included.
The yeast is never rinsed or the liquid replaced with water. I WANT beer to be the liquid to be introduced into the new batch. The new brew is chugging out the fermentation lock within hours, sometimes immediatley, only rarely does it over foam out the top. I also ferment at 45f , so the yeast is always on the cool side of its temperature range. I think this helps the process but I'm not sure. I never have to store yeast separately, its always right there working away, and goes into the next brew with no idle time in between. I mainly use lager yeast as my fermentation room is at a constant 45f most of the year (fall winter spring).. If I make ale, buy a new strain, make a starter, and run off a bunch of ales, for the warmer months when the temps are in range. I live in Innisfil, ontario, so an insulated garage with a thermostat controlled radiant heater keeps temps where they need to be except one to two summer months. I use Saflager 34/70 primarily. This system works for me and pumps out incredible beer at the rate of 10 imp gallons per month.
