From a full boil at 212Deg F, my DIY wart chiller reduced the temperature down to 60 Deg F in 23 minutes.
At the 11 minute mark, Temp' was 158 Deg F (70 Deg C the Dimethyl Sulfide compound cut off temp)
At the 15 minute mark, temp’ was 90 Deg F
At the 17 minute mark, temp’ was 80 Deg F
At the 19 minute mark, temp’ was 70 Deg F
At the 23 minute mark, Temp' was 60 Deg F
I have all the minute/temp' data points if you are interested.
Water temperature used for the chiller was a 49 Deg F ( household)
Flow 1 Gallon @ 40 seconds (approx')
Volume to be cooled 6 gallons
Temp of volume 212 Deg F at full boil
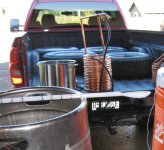
The chiller is a DIY unit that uses two, 20 foot coils of ¼" soft copper tubing.
The outer coil is what you normally see for these chillers it sits about 2†inside my brew pot.
It is reinforced with 4 vertical standpipes of 1†copper tubing
Silver Solder joints at each junction for rigidity.
The other coil runs horizontally inside the larger one
It is reinforced with one, length of 1†copper pipe that is soldered to two opposing stand pipes
Silver Solder holds all coils in place against the 1†copper pipes
The two coils are joined VIA a standard compression T at the inlet and outlet.
I’ve soldered both of the Ts to prevent bacterial hidey holes in the threads and compression cap.
There appears no differential of flow from one coil to the other.
I was not happy with my single coil chiller and felt the need to augment it with liter bottles of ice.
It worked, but was rather clumsy. I had to sterilize the bottles and caps, fill them, bag them, freeze them, and then dip them in warm Star San solution before dropping 'em into the wort. It was a royal PITA.
I think this will be a nice reliable chilling method for me, for the foreseeable future.
I still need to stir the wort or there will develop temperature delta regimes with the warmer fluid at the top and the cold at the bottom.
I am contemplating making the chiller stand higher maybe an inch below the top of the 5 Gallon mark to use thermal convection as the stirring device letting me avoid sticking anything into the wart at all but the chiller which is of course already well boiled.
As a construction tip if you want to try this reinforced chiller structure I used large diameter copper pipe for the frame members precisely because I had to wrestle with the 1/4" tubing to get it to sit still while each solder joint solidified and I needed the thermal sink or elbow room for heat to flow away from the joint quickly so that I was not de-soldering the joints from the heat used to solder the next. I still needed to take occasional breaks to let the pipe cool between solder joints. A mist sprayer with water would have been nice.
My method is pretty straightforward.
After forming the coil:
Apply flux to the two parts about to be joined, heat the 1" pipe locally with a MAPP torch till it just barely takes a blob of solder, grab the 1/4" tubing with a pair of pliers holding it an inch or so away from where the heat will be applied, press the 1/4 tubing against the blob of solder, apply heat so the solder flows nicely, and remove flame holding dead still while solder solidifies.
This makes for a very sturdy construction.
Before soldering, I clamped my 4 stand pipes between two hunks of plywood with little flat bottomed holes bored precisely where I wanted the pipes to be on the diameter so that when I was done it would sit flat and be more truly round. This last bit is purely cosmetic. For chilling purposes it makes no difference whether it sits flat or rolls around.
As an interesting note:
I observed that a lot of condensation forms on the copper tubing above the hot fluid on the inlet side. This will transport bacteria from there down the tube to the beer. Cleansing and sanitizing that section of the unit is mandatory. If I had thought abut it ahead of time I might have allowed a little extra copper tubing to be used to make a loop down ward outside the brew pot so that condensation would drip away not in. I can always add a few inches of copper tubing later.
At the 11 minute mark, Temp' was 158 Deg F (70 Deg C the Dimethyl Sulfide compound cut off temp)
At the 15 minute mark, temp’ was 90 Deg F
At the 17 minute mark, temp’ was 80 Deg F
At the 19 minute mark, temp’ was 70 Deg F
At the 23 minute mark, Temp' was 60 Deg F
I have all the minute/temp' data points if you are interested.
Water temperature used for the chiller was a 49 Deg F ( household)
Flow 1 Gallon @ 40 seconds (approx')
Volume to be cooled 6 gallons
Temp of volume 212 Deg F at full boil
The chiller is a DIY unit that uses two, 20 foot coils of ¼" soft copper tubing.
The outer coil is what you normally see for these chillers it sits about 2†inside my brew pot.
It is reinforced with 4 vertical standpipes of 1†copper tubing
Silver Solder joints at each junction for rigidity.
The other coil runs horizontally inside the larger one
It is reinforced with one, length of 1†copper pipe that is soldered to two opposing stand pipes
Silver Solder holds all coils in place against the 1†copper pipes
The two coils are joined VIA a standard compression T at the inlet and outlet.
I’ve soldered both of the Ts to prevent bacterial hidey holes in the threads and compression cap.
There appears no differential of flow from one coil to the other.
I was not happy with my single coil chiller and felt the need to augment it with liter bottles of ice.
It worked, but was rather clumsy. I had to sterilize the bottles and caps, fill them, bag them, freeze them, and then dip them in warm Star San solution before dropping 'em into the wort. It was a royal PITA.
I think this will be a nice reliable chilling method for me, for the foreseeable future.
I still need to stir the wort or there will develop temperature delta regimes with the warmer fluid at the top and the cold at the bottom.
I am contemplating making the chiller stand higher maybe an inch below the top of the 5 Gallon mark to use thermal convection as the stirring device letting me avoid sticking anything into the wart at all but the chiller which is of course already well boiled.
As a construction tip if you want to try this reinforced chiller structure I used large diameter copper pipe for the frame members precisely because I had to wrestle with the 1/4" tubing to get it to sit still while each solder joint solidified and I needed the thermal sink or elbow room for heat to flow away from the joint quickly so that I was not de-soldering the joints from the heat used to solder the next. I still needed to take occasional breaks to let the pipe cool between solder joints. A mist sprayer with water would have been nice.
My method is pretty straightforward.
After forming the coil:
Apply flux to the two parts about to be joined, heat the 1" pipe locally with a MAPP torch till it just barely takes a blob of solder, grab the 1/4" tubing with a pair of pliers holding it an inch or so away from where the heat will be applied, press the 1/4 tubing against the blob of solder, apply heat so the solder flows nicely, and remove flame holding dead still while solder solidifies.
This makes for a very sturdy construction.
Before soldering, I clamped my 4 stand pipes between two hunks of plywood with little flat bottomed holes bored precisely where I wanted the pipes to be on the diameter so that when I was done it would sit flat and be more truly round. This last bit is purely cosmetic. For chilling purposes it makes no difference whether it sits flat or rolls around.
As an interesting note:
I observed that a lot of condensation forms on the copper tubing above the hot fluid on the inlet side. This will transport bacteria from there down the tube to the beer. Cleansing and sanitizing that section of the unit is mandatory. If I had thought abut it ahead of time I might have allowed a little extra copper tubing to be used to make a loop down ward outside the brew pot so that condensation would drip away not in. I can always add a few inches of copper tubing later.
")