All of the Controls you will ever need...
The panels are all made of 1/2" MDF cut to size. Each has 1/2" quarter round molding on the front edge to provide a finished look and all are covered with Vinyl covering from Parts Express. The edges between the panels are painted black to match the cabinet - this also helps make any gap less noticeable. Panels are cut in widths from 4" to 12", though I do have spacers as small as 2" wide. I have a 24" wide cabinet, so I can put any combination together that totals 24".
In the end quite a few panels were created. Originally I wanted only a few, but by the time I finished laying out everything including various size spacer panels I ended up with 16! Another dozen or so were cut and drilled for future expansion.
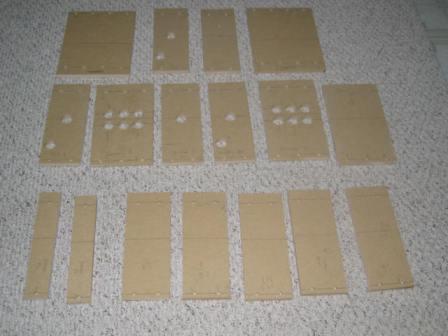 | The initial run of panels before wiring and covering. You can see the button and joystick holes as well as the smaller mounting holes that match up with the front and rear dowel rails. Later, additional panels were cut to the same size as these for future expansion. |
A tray built into the back of the cabinet to hold extra panels while not in use. It sits just below the monitor shelf. The cabinet is on sliders and can be pulled out easily to reach needed panels. |
|
Current Set of Panels - width of panel in parenthesis:
Future Panels:
Test fitting of some panels. Though each panel was cut and drilled precisely, many of the panels required some minor adjustment to get them to fit properly. Quarter round 1/2" molding was attached to the front edge for a finished look. All panels were covered with heavy black textured vinyl from Parts Express. | 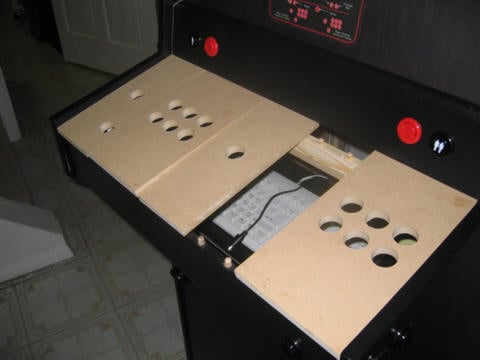 |
Since most of the joysticks were bottom mount, the joystick panels were very easy to make. All are 4" wide panels.
Each joystick has about 8 wood screws with lock washers to secure it to the panel. I did this to avoid mounting bolts above the panel.
Several of the panels have a "thumb button" on them which aligns neatly as the thumb button for neo-geo type games when you put the joystick panel next to a 6 button panel. This button is wired to button 7 on the interface.
| Array of Joystick Panels: Top row includes Two Top-fire joysticks, a four-way diagonally mounted "Q-bert" stick and an Analog joystick. Bottom row includes two Happs competition sticks, a Pac-Man/Galaga reunion stick, a four way Wico leaf joystick and a 8-way "Tron" style stick made from an old Logitech Wingman PC joystick mounted on a "Competition" base. Not shown - Two new perfect 360 optical joystick panels and also a two way vertical joystick.
|
Perfect 360 Joysticks - A recent addition, the Happs Perfect 360 optical joysticks are aptly named. In fact they are pretty close to perfect! They have a very short throw, quick response, easy to find corners and they are superior to all of the other joysticks I own for 8 way games. They do require a separate power connection, however.
Top Fire 8-way Joysticks - I have a pair of these, one of the Happs style and a second from grovygamegear.com. Both have a similar feel and handling and both are responsive for the tank style games I used them for. In retrospect I wish I had purchased at least one four way version as the diagonals are not needed for most tank style games.
4 Way Happs Ultimate - This joystick is my Q-bert diagonal mount joystick. It is light and pretty responsive and has a nice diamond actuator. For many 4-way games I would rate my other two 4-way joysticks as superior, but for simple Q-bert play this one is just fine.
Saitek Analog Joystick - The conversion is detailed below, but this is the ideal readily available commercial analog joystick for panel mounting. It is cheap and easy to mount on a wood panel. Performance on flight games is good.
Happs Competition Joysticks - These are 8-way fighting style joysticks that I personally really like. Some people prefer stiffer joysticks, but I really like the light touch of these joysticks.
Pac-Man/Galaga Reunion Joystick - A top-mount 4 way joystick with microswitches. The short throw on this joystick makes it very quick and responsive for games like Pac-man. The ball on top is a little small for my taste, but overall it is a great 4 way joystick.
Wico 4-way Leaf Joystick - No longer manufactured, but often available on ebay. This is my favorite 4 way joystick as it has a nice size ball, is easy to mount on a wood panel and has the nostalgia of the leaf switches. For pure maze action, the longer throw is not quite as quick as the Pac-Man/Galaga reunion stick, but it still has a great feel to it.
Tron Style Joystick - Again, the conversion is detailed below. This is a Logitech wingman handle on a Happs competition base. It works great for 8-way games of all types. The only issue is with the light-cycles leve on Tron itself. This (and all other) 8 way joystick tends to zig-zag a bit on the light cycles level. The original Tron joystick had a diamond actuator that helped significantly reduce this. So far I have managed to get around this problem using an alternate four way joystick for just that level.
Perhaps the best performing 8-way joysticks available today - the Perfect 360's are fully optical joysticks with no microswitches. Instead the actuator breaks a beam of light to determine each direction. This makes for very smooth 360 degree motion, a short throw, and smooth transitions in every direction.
| The new Happ Perfect 360 Optical Joysticks (in black)! These are truly amazing joysticks - very short throw, very responsive and an optical action. I found a good price on a pair, installed them on two panels and now use them as my main 8-way joysticks. |
The Perfect 360 fits nicely on a 4" panel. You can see both the modular plug that feeds into the IPAC and the separate 5V power connector for the P360 optical system. (see wiring for more details) Like many of my panels, this one also includes the separate thumb button. |
|
| The Happ P360's do require a 5 volt power supply to run the optical action. I decided to run a separate 5V wire up from the main computer, using an extra hard drive connector on the computer power supply. The 5 volt supply runs to the small power connector to the left of the main panel. I used a Radio Shack "M" DC power connector to run power to the P360 joystick. This allows for quick connect and removal, but no danger of confusing the connectors. |
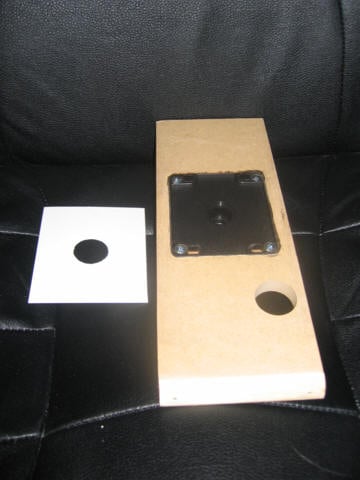
The top fire joysticks and also the Galaga/Pac Man reunion joystick presented a special challenge as all are top mounted joysticks. I ended up routing the wood to match the depth of the base, and placed some reinforcement on the bottom to provide a stable base. The top was covered with heavy cardstock and then the normal black vinyl to provide a nice clean finish.
Top-fire joystick base mounted on top of the panel. The top-fire joystick was a bit of a bigger challenge as it was too short to be bottom mounted. I routed out the wood to countersink the joystick base and then used some metal strips on the bottom to give the panel more strength. The white panel is some hard plastic that I used to cover the area over the base. The entire panel was then covered in vinyl like the other panels. The hole at bottom right is the "thumb button" which acts as a seventh button for "neo-geo" style layouts. I used a similar mounting for the Pac-Man/Galaga joystick.
|  |
An inexpensive 4 way Happs Ultimate joystick was diagonal mounted to act as a dedicated "Q-Bert" style panel. The stick actually moves to the four diagonals only and not up/down or right/left like a normal stick. This matches the behavior of Q-bert, Congo Bongo, and a number of other games that had diagonal four way movement.
The only problem was that the cross mounted joystick base was a bit more than 4" wide. I solved this by cutting the corners of the base off with a dremel tool and then carefully mounting it at a 45 degree angle.
Diagonal Mount 4-way joystick panel used for games like Q-bert. This is a Happs 4-Way Ultimate joystick mounted diagonally. From the top it looks just like my other joysticks. You can see that the corners had to be trimmed a bit to fit within the 4" panel size. | 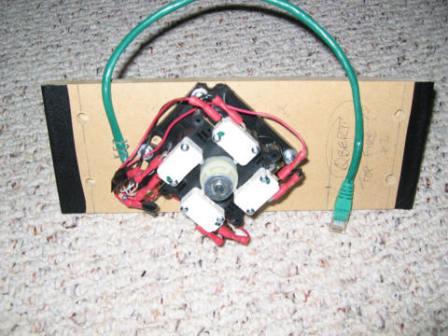 |
I wanted a "Tron" style joystick with an 8-way base for playing games like Tron, Gorf and a number of others. I decided to hack an old PC analog joystick (in this case a Logitech Wingman Digital Extreme) and mount it on a Happs Ultimate 8-way joystick base.
The original joystick had a trigger button, two pickle buttons, a POV hat and a thumb button. I decided three buttons was enough for the games I wanted to play, so I wired the two pickle buttons together, leaving the trigger, pickle buttons and thumb buttons functional. The POV hat is not functional.
Step 1: Unscrewed the halves of the Wingman Digital Extreme joystick, and then disconnected the wires from the base so I could remove the two handle halves.
Step 2: Took the handle from the Happs Ultimate joystick and carefully whittled away the plastic handle to leave just the steel shaft.
Step 3: Drilled a hole in the shaft corresponding to the plastic pin molded into both halves - this secures the halves to the shaft.
Step 4: Rewired the buttons to bypass the small PC board in the joystick. The PC board had pull up resistors and other undesirable elements, so I just bypassed them and wired directly to each switch.
Step 5: Removed the rubber skirt and trimmed it a bit. You can see the rubber skirt, joystick halves, and shaft below.
Step 6: Carefully measured and drilled a hole in the plastic sleeve and shaft to install a pin (below) to keep the shaft from rotating on the base. Without this the handle would easily turn - even though we want it to stay forward facing.
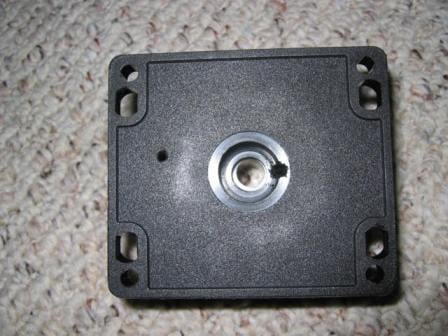
Step 7: Notch the Happs Ultimate joystick base (as shown) to provide a guide for the pin in the bearing (from step 6). The combination of pin and notch will keep the stick from rotating on the base.
This started as an old Wingman Digital Extreme joystick. Since I had long ago switched to XP and USB on all of my PC's I did not need the joystick any longer. Shown here are the handle halves from the original joystick. The joystick rod is from a Happs Ultimate Joystick with the plastic handle trimmed away. The rubber fairing is also from the original Wingman joystick. | 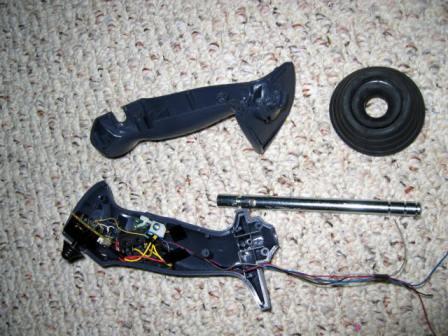 |
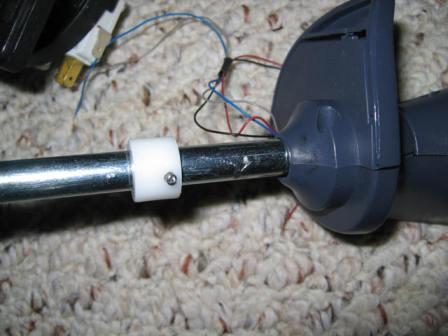 | Next step was to fit the joystick halves on the shaft securely and then set up a pin mechanism so the joystick would not rotate. This is another great tip I found from the BYOAC site. Here a hole is drilled in the shaft and plastic sleeve and a small nail is inserted with the head cut off. This nail goes into a slot cut in the base (below) to keep the joystick from rotating. Note that this picture is not quite correct - it is best to mount the nail near the bottom of the bearing on the shaft to prevent it from coming out when you pull the joystick back. I ended up drilling a second hole near the bottom when I discovered this problem the hard way. |
The Happs Ultimate joystick base with a notch cut in it. The notch matches with the pin in the picture above to keep the joystick from rotating around the base.
|  |
| The finished product! A three button joystick mounted on an 8-way base. Suitable for use with games such as Tron, Gorf, and many others. |
Side view of the panel. You can see the handle, rubber fairing, 8 way base and RJ45 wiring. Also visible is the catch that matches the roller latches mounted on the cabinet to secure the front edge of the panel during play. |
|
I started with panels, each with six buttons in a fighter style layout. Both are 6" wide. As noted earlier, the six buttons align properly with the "thumb button" on the joystick panels to create a seven button layout as long as the two panels are adjacent. These can also be used for general purpose use with the trackball or steering wheel. With the two six button panels and the seventh thumb button on the joysticks I have been able to duplicate the layouts of my favorite games so far.
| Two button panels, each with six buttons. The black button is button 1 on my layout - I tell guests to press the black one for fire. You can also clearly see the RJ45 cables and connectors for each panel.
|
A recent addition was two four-button panels. These are great for many of the older games and a handful of arcade games that used a diamond layout to fire in different directions. They are also useful for emulating some console layouts. A diamond pattern is common for many game console controllers.
New four-button panels on a 4" base. The purpose of these is two-fold. First, in a two player setup they free up enough space to leave a trackball in the center along with both joysticks and button panels. Second, the diamond layout matches many console games and some arcade games much better than the six button fighter layout. |
|
One game that was difficult to play in the original layout was Defender (and also Stargate). I decided a separate button panel was needed, and also created a two way vertical joystick with thumb button to go with this panel.
The new Defender/Stargate button panel. With the exception of the thumb button (hyperspace) which is spaced too close, the other buttons all match the original Stargate measurements (Defender did not have the Invisio button) Not shown is a matching two way joystick with thumb buttons that goes on the left side of the panel to match the original controls. The combination of the two way joystick with thumb button, plus the 5 buttons shown provide controls that match the original layout. The hyperspace button can be moved over using a 2" spacer between panels if desired. I happen to like playing it this way. |
|
There are two buttons mounted on each side of the cabinet. One acts as the flipper, and one acts as the "nudge" button. These work particularly well with Visual Pinball. These are both mounted within reach of the edge, providing an authentic "pinball" feel. The narrow 24" cabinet also contributes to this feel, as your hands are in a natural position when playing. I've even had a few players attempt to rock the entire cabinet when playing - so perhaps I need to add a tilt detector to the cabinet.
In addition a single button is mounted on the front of the control panel to act as the "plunger". The longer you hold the button down, the more pull you get from the plunger in Visual Pinball. You can see the plunger position in the picture above of the Defender button layout. Unfortunately the buttons are black so they tend to blend in on many pictures. The holes for both the flippers and plunger can be seen clearly on the unpainted cabinet picture here.
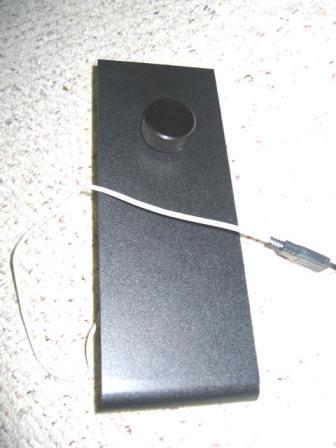
My original panel had this USB Oscar spinner on it. I remounted it on a 4" panel and also mounted the USB interface card on the bottom with some velcro.
What is very nice about the USB interface is that the devices are also hot swappable. I just plug the spinner or trackball into the 4 port USB hub mounted below the control panel and Windows automatically detects it and configures it.
An Oscar Spinner mounted on a 4" panel with a USB interface board (Oscar interface).
I use this board a lot - it usually sits in the middle on my "dual fighter" layout.
|  |
One of the driving forces for the conversion to a modular panel was the fact that there was not enough room for a full size trackball on the original static panel.
The original cabinet had a small logitech wireless trackball, but the smaller ball proved useful only for positive control games like missile command and centipede. The small ball would not spin correctly at high speed for golf games, bowling, shuffleboard and the like.
This is an Imperial/Wico 3" trackball taken from a "Golden Tee" game mounted on a 8" panel. It works well for just about anything and has a nice weight and feel to it.
The mounting method is somewhat unique. I did not want to use a metal mounting plate, so I flush mounted the trackball to the level of the wood and then used angle irons to screw/bolt directly into the wood and the top half of the plastic case on the trackball. You just need to be careful where you put the screws so they don't interfere with any of the internal components. A nice consequence is that you can easily remove the bottom half of the trackball case for cleaning/maintenance.
| Full size 3" Imperial Trackball on 8" panel The three buttons above the trackball are the left, middle and right mouse buttons. This panel uses a USB mouse hack, which allows me to hot swap the panel at any time by just removing it from the USB hub.
|
Bottom of the trackball panel. The trackball is mounted with four strong angle irons and bolts that fit into the upper half of the trackball case and wood. This allows the bottom half to be removed for cleaning and servicing. The three buttons are visible at the top of the panel and the 1/2 size USB mouse board is attached to the side of the case just below the mass of wires. The mass of wires is there because I connected all of the trackball inputs with individual crimp connectors so I could easily swap them. This made it much easier to adjust the x and y directions by just swapping connectors after it was wired. At the bottom you can see the four holes that match the front rail and some staples that help hold the vinyl in place. | 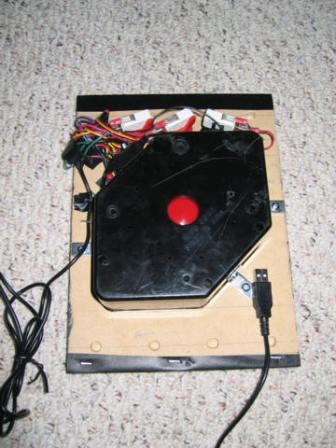 |
This driving wheel came from a 1980's Pole Position control panel I picked up from ebay. The wheel is heavy and solid. I originally envisioned mounting it at an angle, but then realized that I had sufficient room to mount it directly on a panel. This also let me fit it into a small 6" panel, which leaves me room for a second steering wheel (player 2!) in the future if I need it. The wheel is very responsive.
A genuine Atari Pole Position 360 degree steering wheel mounted on a 6" wood panel. It works remarkably well for 360 degree driving games. I usually run it in this configuration using the joystick on the right as a gear shift and the buttons for other functions. There is sufficiency room all the way around to drive it. The joystick on the left is optional - it can be replaced with a spacer if needed. | 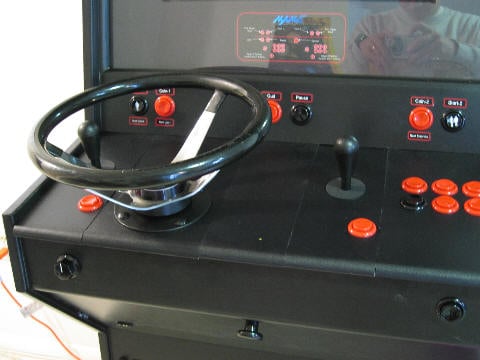 |
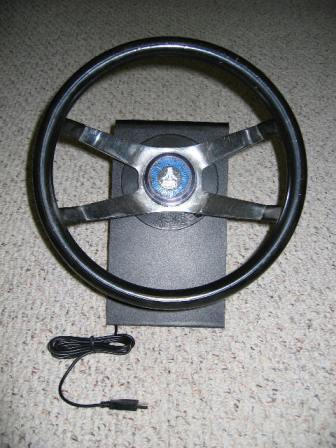 | A closeup of the panel. I bought the authentic "Pole Position" steering wheel panel from ebay. It was in pretty rough shape when it first arrived, and required considerable cleaning. The gear shift was a bit of a disappointment since it is an "always-on/off" arrangement which does not even match the MAME config for Pole Position. However the steering wheel was worth the price - as it performs beautifully in all of the 360 degree driving games.
|
The optical board bracket was badly bent, so much so that the gears would not even connect properly. I managed to hammer it back into place, replace a few broken parts and get it working again. I did a quick USB mouse hack to the existing Atari optical board to make the steering wheel work properly. I temporarily mounted it with some electrical tape, but plan to go back later with something more secure. I would really like to pick up a second wheel sometime as I have room for two wheels on the cabinet! | 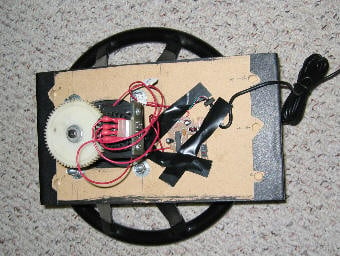 |
 |
I needed a set of digital pedals to run with many of the old games (I have an analog set below). A friend recommended the perfect thing - ConnTrol International's foot pedals. I bought model #862-1000-00 for < $10 each. Each pedal contains a small microswitch that can be wired just like any other button. I wired them into a modular plug and use them in the player1 button socket as gas/brake pedals. They also come in handy on shooting games for reloading and firing grenades!
|
I already had a USB sidewinder driving wheel purchased for PC games, so the obvious choice for 270 degree driving games was to mount it to a panel and start playing! In this case an 12" wide driving panel was cut to stick out far enough in front to support the sidewinder clamp. Since the wheel is USB, it can easily be hot swapped as well. The pedals go along with the Sidewinder wheel - they plug directly into it with a modular cord.
Microsoft Sidewinder Driving Wheel mounted on a 12" wide panel. The oversize panel fits into the cabinet as any other, and the wheel is USB so it can be hot swapped at will. This provides a 270 degree steering wheel (different from the 360 Pole Position shown above). The pedals are standard ones that come with the Sidewinder. These serve as analog pedals when needed. I also have a set of digital pedals shown in the previous section. If needed one could fit two 12" driving panels into the 24" cabinet for dual player action - but so far I've had enough fun driving in single player mode. I have used the analog pedals in conjunction with the 360 degree pole position steering wheel shown in the previous section, and also this steering wheel can be used with the digital pedals shown in the previous section. | 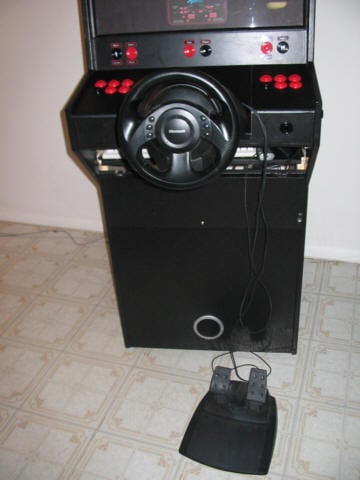 |
Probably the least exciting, but easiest to make. Four different size spacers were cut, and made duplicates of the smaller ones.
In practice I don't use the spacers all that much since it is usually easier to pop and extra button or spinner panel into any extra space on the panel. However there are those times when a 2" or 4" spacer is a necessity when you are trying to develop a particular layout or center your layout properly on the overall board.
Spacers for filling in the blanks.
Shown here are 2", 4", 6" and 8" spacers. All are cut and drilled just like the other panels. |
|
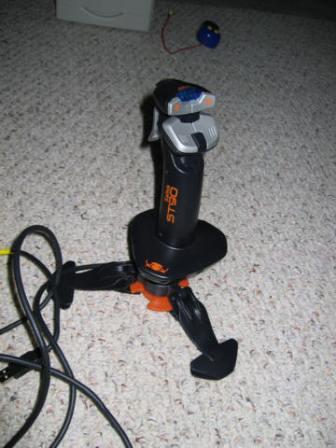
I mounted a Saitek ST90 Analog joystick on a panel. It works great, and since it is USB it is easily hot swapped like any other 4" panel.
A Saitek ST90 USB Analog Joystick I am mounting to a 4" joystick panel. Three buttons plus a button-driven digital throttle. Total cost was $14. The arms on the bottom screw off. The joystick actually rotates on a ball above the base, so it is easily mounted on a wood base with some epoxy. Not as sophisticated as some of today's fancy 20 button joysticks, but 3 buttons and a throttle are enough for most arcade style games. I can always program my button panels if I need more buttons for a particular PC game.
|  |
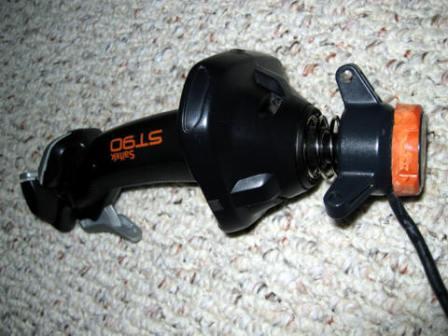 | The Joystick with the arms removed and the edges fo the bottom plastic part cut off and sanded with a dremel tool.
|
A 4" wood panel (just like all the others) was made, and then a hold drilled to fit the base. Next the arms were carefully marked and cut out with a jigsaw. Finally the panel was covered with vinyl just before mounting the joystick to it (shown here). The joystick was mounted with a liberal amount of epoxy - both to the arms and bottom of the joystick. Since the joystick pivots on a ball a few inches above the base, there is no problem with the mechanism on this joystick interfering with the panel. | 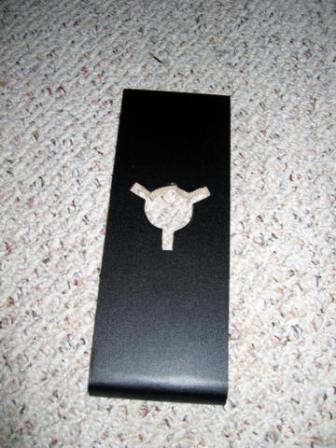 |
| The finished product! Since the joystick is USB - it can be hot swapped just like any of my other modular panels. Just plug it in and go! |
While not a separate panel, the two light guns slide into the large keyboard tray for storage.
I was skeptical at first, but a friend loaned me an Act-Labs light gun to try out on my cabinet. After a few minutes of setup and some adjustments to the monitor settings I was shooting at everything in sight. Act-labs has a good list of supported games on their web site.
Later I purchased a second gun since many of the shooting games support two players. It is fun to go head to head. The only complication with a second PC style joystick is that regular MAME does not support it. However AnalogMame+ or NoNameMame do a great job with two lightguns.
Dual Act-Labs PC Light Guns. These are surprisingly accurate if properly calibrated, though you have to play with the monitor settings a bit on first use.
|  |
After building a two player panel and having some friends over, I quickly realized there are rare occasions where it makes sense to have a four player panel. However, I certainly did not want to attach wings to the existing panel, so the idea of using a USB gamepad for players 3 and 4 seemed attractive.
I also liked the idea of using these joysticks on the road with my laptop. Since they are USB, and compact, they fit easily into my suitcase and allow me to still play many of my favorite games on the road.
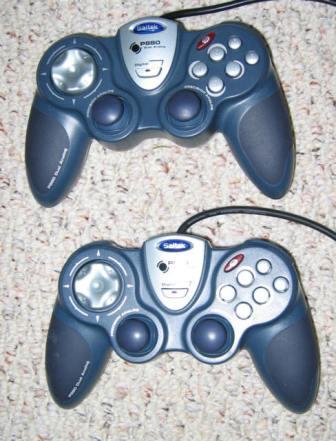
After doing quite a bit of research, I finally settled on a pair of Saitek P880 gamepads, which have a street price under $20 each. The advantages of these pads included: a six button panel (for use on the road), a digital/analog switch that allows the left joystick to simulate a digital joystick, dual flipper buttons (which I also use for coin/start buttons) and dual joysticks for games like Robotron.
Four player action, or use them on the road with your laptop. These USB gamepads can be plugged into the USB port on my cabinet as player 3 and 4 using the JoyToKey mapping program. I selected these two Saitek P880 gamepads for the six button layout, digital emulation mode, dual joysticks and shoulder buttons.
|  |
The final piece of the puzzle was to find the correct software to map the joysticks to corresponding MAME keys for player 3 and 4. I tried using the Saitek software, but it was quite cumbersome for simple mappings. Similarly remapping MAME itself turned out to be too painful.
I finally found this great utility called JoyToKey which does exactly what I wanted. You just start it up before you run the front-end or MAME and keep it running while you play. It lets you map each key and direction independently and also does a great job handling the POV mapping. After a few minutes I had both USB gamepads mapped to the correct MAME keys for players three and four. I mapped the two shoulder keys to be player start and coin buttons. In no time at all the four player games were running great!
These USB gamepads can be plugged into the USB port on my cabinet as player 3 and 4 using the JoyToKey mapping program. They have more than enough buttons to handle all of the popular four player games, and can also be used standalone with a PC or laptop to play games on the road. |  |