
Last week I covered the basic features and setup of the Brewmaster Chronical from SS Brewtech. This week I ferment a few batches of beer to see how well the fermenter performs. [Note – I included some affiliate links in this post – use them if you want to support the blog]
The SS Brewtech Conical Fermenters
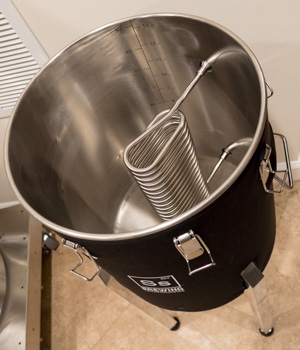
I covered the detailed features of the “Chronical” fermenter in part 1 of this article. It comes in two versions (standard and “Brewmaster” series) and four different sizes (7 gal, 14 gal, half barrel, and full barrel). I purchased the 14 gallon (53 l) Brewmaster series chronical to brew 10 gal (38 l) beer batches on my Blichmann BrewEasy system. The brewmaster series includes a number of “extra” features including a stainless steel chilling coil, butterfly valves, and sampling valve.
Brew Day and Transfer
To fully use the Brewtech Chronicals you do need a few accessories – which I’ve covered later in this article.
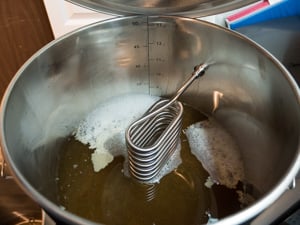
To sanitize the conical I filled it with Starsan after first soaking the various fittings, valves and clamps in Starsan and assembling them. Near the end of my brew day I emptied it out and prepared for transfer. I filled the fermenter directly from my kettle by pumping it through the Therminator wort chiller and into the bottom of the conical. The conical has volume markings on the inside of the fermenter which make it easy to manage your target volume.
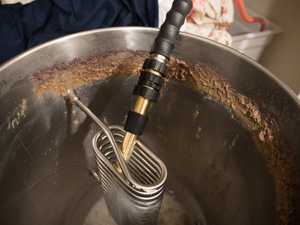
I aerated the wort using a Blichmann oxygen wand and pure oxygen (which I’ll cover in a separate review) and pitched the yeast in the top. The 3″ tri-clamp on the top of the fermenter makes it easy to add spices or dry hops, and the entire lid is removable if you really need to get in and remove a large additive like a bag of fruit. The last step was sealing the top tri-clamp and fitting a 1/2″ hose running down to a small container of water acting as an air lock.
The FTSS Temperature Control System

The optional FTSS system for the Brewmaster series consists of just a submersible pump and a temperature control unit with a thermcouple, plus a short length of vinyl hose. You need a separate picnic or igloo (Gott) cooler with ice in it to provide a cold water source. I used my old Igloo (Gott) cooler that was once a mash tun. You also need to change the ice out every 12-24 hours.
There is also an optional unit with a heating pad if you need both heating and chilling. I did not test the heating pad as my basement remains warm year round.
In operation, the control unit monitors temperature of the fermenter using a thermocouple in the thermowell. When the temperature rises more than a degree above the temperature you set it starts the pump up which recirculates cold water from the cooler through the coil in the fermenter and chills it.
In practice the system worked very well keeping my fermentation temperature within a degree (F) of my set point. The only problem is that you need to change the ice frequently, particularly during active fermentation. I had to add about a 2 liters of ice every 12 hours to keep a 65 F (18 C) fermentation temperature with a 72 F (22 C) room temperature. I simply rotated half-liter bottles of water/ice through my freezer.
The other limitation is that you really can’t use the system to ferment at lager temperatures or cold crash your beer unless you have a much stronger chill source such as a glycol chiller or perhaps refrigerator that you can rotate chilled water through. Some people have bought glycol chilling units or aquarium chillers and made them work, but in practice this is probably more expensive than just buying a traditional freezer/keezer and fermenting in it. Alternately you can try fermenting your lagers around 64 F or 65 F which many homebrewers have had succcess with.
Fermentation, Yeast/Trub Collection and Sampling
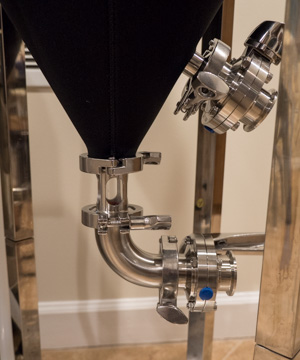
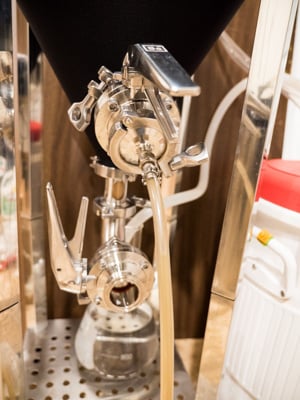
Other than keeping my cooler fed with ice for the FTSS system, the fermenter is basically maintenance free. I did choose to dump trub from the lower valve every three days or so during active fermentation. You don’t want to allow too much trub to build up as it can actually block the large valve. The sight glass helped as I could dump trub once the sight glass filled up. The butterfly valve worked perfectly for dumping trub as it provdes a large opening. I sanitized it with some star-san in a spray bottle and dumped the trub into a bucket until liquid started coming out.
On my second batch I collected some yeast from the early fermentation by dumping into a sanitized container and then transferring to a flask. Later I washed the yeast and put it in my fridge to use as a starter for a future batch of beer.
One feature I really liked was the sampling port. Its a small 3/8″ valve on the side of the unit that lets you draw out a small sample of beer to monitor specific gravity or taste/view a small sample. Using a refractometer and small beer sample I could easily track finishing gravity and also taste the beer as it progressed.
By monitoring the gravity, clarity and also the amount of trub being produced every three days it was very easy to decide when the beer was largely done clearing and ready to be kegged.
Pressurized Transfer and Racking
In preparation for transfer I dumped the trub once more to make sure the racking arm was sitting in clean beer. Since the 14 gal units sits low to the floor and weighs well over 100 lbs (43+ kilos) when full, I purchased some fittings to do a pressurized transfer using the CO2 tank from my kegerator. The Chronical is only rated to about 5 psi (34 kPa) so you need to apply very low pressure with your regulator and be a little patient during the transfer.
The basic configuration attaches the CO2 tank to a hose that goes to the 3″ tri-clamp fitting on the top of the fermenter. Another hose connects the 1.5″ tri-clamp racking valve to the “out” port on my ball kegs. That way the beer flows down the output tube in the keg and fills the keg from the bottom up. You can also purge the keg with some CO2 to provide a blanket of CO2 in the keg when filling it.
To transfer you first set your CO2 regulator to zero pressure, then open the racking valve and very slowly apply pressure until beer flows into the keg. Even though the adapter on top of the Chronical has a pressure relief valve, I kept pressure low during transfer while filling the keg.
It took me less than 15 minutes to fill two ball kegs and almost no sediment was transferred. I was also surprised to find there was almost no beer remaining in the fermenter after transfer as the conical is quite narrow below the racking valve.
Cleanup and Reset
Cleaning the fermenter after brewing turned out to be incredibly easy. The top comes off the fermenter so you can get in and clean out any sediment. Honestly a quick spray with a hose removed almost all of the sediment – most of which was at the top of the fermenter near the fill line. To make sure it was fully clean I filled it with hot water and PBW and let it sit before rinsing clean. I then removed and cleaned up the valves and various fittings.
It probably took longer to fill the fermenter with PBW fully and rinse it than it did to actually scrub out any debris.
Accessories
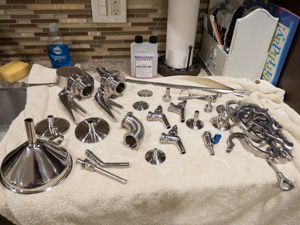
To make full use of the Brewtech Chronical you do need a few extra fittings and accessories. In addition I purchased a few “extras” to go with the system. Accessories are available from the SS Brewtech website as well as many larger stores that carry SS Brewtech equipment. In addition you can buy Tri-clamp fittings and parts from many other brewing sources as the system uses 1.5″ and 3″ standard tri-clamp fittings.
Here are some of the items I added and my quick thoughts:
- FTSS Temperature Control System – This comes in several versions. One set is for the Brewmaster series and another is for the standard series. The standard series version includes a new cover with the chilling coil. In addition there are variants that include heating pads if you need both heating and chilling. I purchased the chilling version.
- Leg Extensions and Shelf – The leg extensions are about 10″ long and raise the unit well off the floor. They also provide room for additional accessories like a sight glass. Mine were a bit of a disappointment because they did not fit well (not straight after being screwed in) and also not tall enough to permit racking directly to a keg by gravity. The shelf (a separate purchase) does provide a lot more stability to the otherwise poorly fitting legs. I’m honestly not sure the system would support itself well if you purchase the leg extensions without the extra shelf. If you are going to extend the legs, get the shelf too.
- Casters – These screw into the bottom of the legs so you can roll the fermenter around. These were nice additions as I can move the full fermenter easier and also move it around for cleaning.
- Sight Glass – I purchased a small 1.5″ tri-clamp sight glass on a sale, but it is handy for viewing fermentation activity and also knowing when to dump the trub.
- Tri-Clamp Filling Fittings – I got a few 1/2″ barb to tri-clamp fittings so I could fill the fermenter from my therminator wort chiller, and dump trub easily.
- Pressure Transfer Fittings – This involved a few pieces to be able to apply low pressure from my CO2 tank. Basically you need an adapter to take the smaller 5/16″ gas hose up to the 1/2″ hose that fits into the tri-clamp fitting on top of the fermenter.
Final Impression
 Despite a few minor negatives involved in first time cleaning, leg extensions and setup (covered in part 1), I found the Chronical fermenter a joy to brew with. Cleaning and sanitation was very simple. Filling and sealing the fermenter was easy. The FTSS temperature control system worked well, maintaining fermentation temperatures within a degree (F) for ales, as long as I kept the cooler fed with ice.
Fermentation itself went very well – with both batches fermenting out quickly, stopping suddenly when they reached their final gravity. Being able to collect yeast and remove sediment meant no need to transfer to a secondary or tertiary fermenter. Since I could monitor gravity and clarity from the sampling port and also monitor trub production from the dump valve it was easy to decide when to keg the beer.
The pressurized transfer system also worked well as I could rack the beer directly into the keg without exposing it to air. Cleanup after brewing was very simple – most of it was done by rinsing with a hose, though of course I did properly clean and sanitize before reusing.
All of this convenience comes at a price of course. At the time of this writing the 14 gal Brewmaster Chronical is priced at $775 and the standard 14 gal version is $495. After adding the cooling system and accessories you probably approach $800-1000+ for the complete system. The smaller 7 gal systems come in at $395 and $650 for the standard and Brewtech editions. Also the FTSS system really is only applicable at ale temperatures unless you get a separate refrigerator or glycol chiller, though Marshall at Brulosophy has done some interesting experiments with fermenting lagers at low ale temperatures (mid 60’s F), which this unit can certainly reach.
All of that being said, there is no comparative stainless steel home brew fermenters in this price range with the same features at this time. The Chronical, being all stainless, will likely provide a lifetime of service for most brewers. I’ve been seriously considering purchasing a second one to use for my meads and ciders.
If you want to purchase a Chronical, I recommend you shop for yours at Great Fermenations – as they are supporters of the BeerSmith sites. Thanks for joining me on the BeerSmith Home Brewing Blog. Be sure to sign up for my newsletter or my podcast (also on itunes…and youtube…and streaming radio station) for more great tips on homebrewing.
I don’t have a pump in my set up yet (I plan to add one and the CIP sprayer), so in the meantime, I gravity fill from the top. I figure letting the wort splash in just gives another opportunity to add oxygen before I put the stone in. I’ll have to look into the sight glass. Seems like a handy addition.
Great review, I’ve just bought a 7gal Chronical and this was just what I was looking for. Cheers.