 Creating an equipment profile for your particular brewing system is an important first step for new users of BeerSmith brewing software. The equipment profile is used throughout the program to calculate estimates of beer color, bitterness, original gravity and volumes. The profile can also be used to scale recipes found on the BeerSmithRecipes cloud or online.
If you have multiple equipment setups or regularly brew different batch sizes you may need more than one equipment profile. You can create each using the method outlined below.
Note that I also have a video tutorial online which will walk you through the process described below, and also some equipment setups from Blichmann and others are available as add-ons from File->Add-ons (click on the add button).
Creating Your Own Equipment Profile – Step One
 The equipment wizard is the easiest method for creating a new equipment setup. Select the Equipment Wizard command from the Insert menu. In the dialog give your profile a name such as “Brad’s Equipment”.
The next field to fill is the Batch Volume. Batch volume is the volume of wort that will go into the fermenter at the end of your brewing session. By tradition, this is the volume most brewers specify when someone asks how large a batch you are brewing. So a 5 gallon or 20 liter recipe means that we’ll brew 5 gallons (or 20 liters) into the fermenter.
Below that you need to estimate Fermenter Loss – how much liquid you lose in fermentation – to sediment and transfer losses before bottling. Its not unusual to lose 2-3 quarts (2-3 liters) for a 5 gallon (19 l) batch. After you enter this number you’ll see the estimated bottling volume which is simply the batch volume minus fermentation losses.
Post Boil Additions and Losses
Now that we’ve got the target batch volume, we’re going to work backwards to determine how much water is needed in the boil to get to our target batch volume. The next section in the wizard shows the post-boil additions and losses.
The first field in this section is Top Up Water. Top Up Water is water added after the boil, usually by extract brewers. Many extract brewers brew with a smaller stove-top pot of 3-4 gallons (12-16 liters) and then add 2+ gallons (8+ liters) or more water after the boil to bring their volume up to the desired level in the fermenter. This added water is the Top Up Water.
All grain brewers usually work with larger full volume boils, so they rarely need any top up water. So if you are an all grain brewers the top-up water should be set to zero.
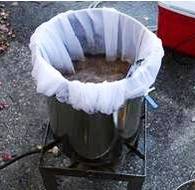
The next number shown is the Loss to Trub and Chiller. This is the volume of wort lost to the sediment (called trub) left in the bottom of the pot after the boil as well as any losses from the use of a chiller or losses in transferring the wort. For a typical 5 gallon (19 liter) batch its not unusual to have 2 quarts (2 liters) or more of loss to trub, though it can be more or less depending on your brewing technique and how you manage your grain and hop additions.
Below that you will see an estimate for Post-Boil shrinkage – since water volumes shrink by about 4% as the water cools. And finally you will see an estimate for the post-boil volume needed for your equipment setup. This is simply the sum of the target batch volume plus trub loss minus any top-up water. Its an estimate of how much wort you need to have when you finish the boil to hit your target batch volume into the fermenter.
Click on the Next button at the bottom to proceed to the next page in the wizard.
Step Two: Boil Volumes and Details
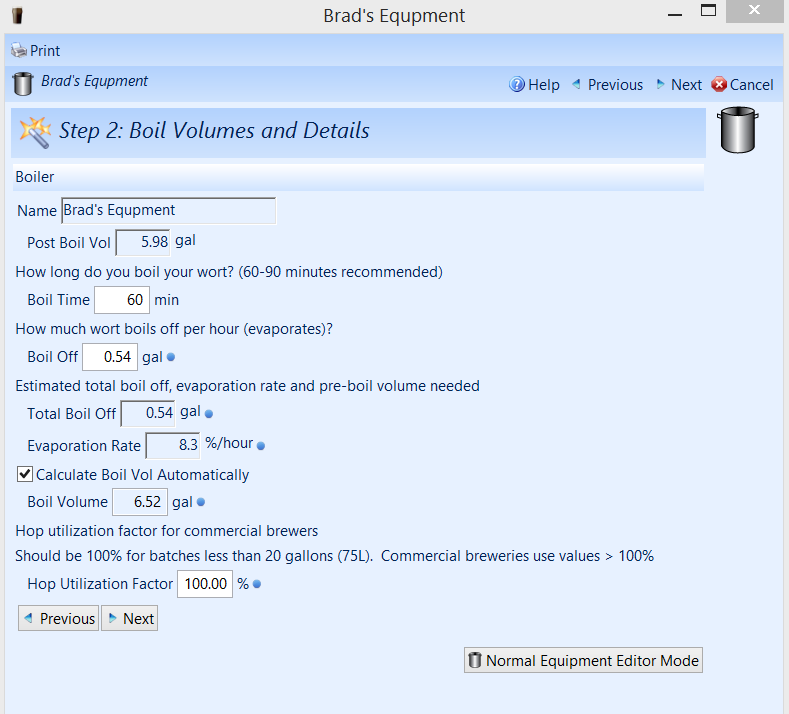 On the next page the wizard is working to estimate the boil volume needed to brew our beer. At the top we see our estimated Post-Boil Volume that was calculated from the previous page.
Below that you can enter the Boil Time which is simply the number of minutes you are going to boil your wort. Typically 60-90 minute boils are used with many all grain brewers preferring a longer 90 minute boil.
Below that field, enter your Boil Off rate which is the amount of water that evaporates per hour of boil. The best way to get this number is to measure the boil off for your particular system, but if you don’t know the value you can enter a volume corresponding to about 15% per hour which is typical for many homebrew systems. The Evaporation Rate will be shown as a percentage per hour.
Below that there is a checkbox to Calculate Boil Volume Automatically which I recommend you leave checked. This will let the program estimate your boil volume by taking the post-boil volume from the previous page and adding in the boil off to get an estimate of the pre-boil volume needed to hit your targets when brewing. You can enter a pre-boil volume yourself, but if you do this the volumes may not add up properly and you my find yourself with too much or too little wort later on.
Finally near the bottom of this page there is a Hop Utilization Factor shown. This is a hop utilization adjustment that is used by many commercial brewers to compensate for the high utilization they get when brewing multi-barrel batches of beer. Home brewers working with systems smaller than 20 gallons (< 76 liters) can leave the hop utilization at 100%. Commercial brewers working with large systems often achieve utilization factors above 100% and will need to enter a higher value here to compensate for the higher utilization they get.
Hit the Next button at the bottom of the page to go to the final page.
Step Three: Mash Details for All Grain
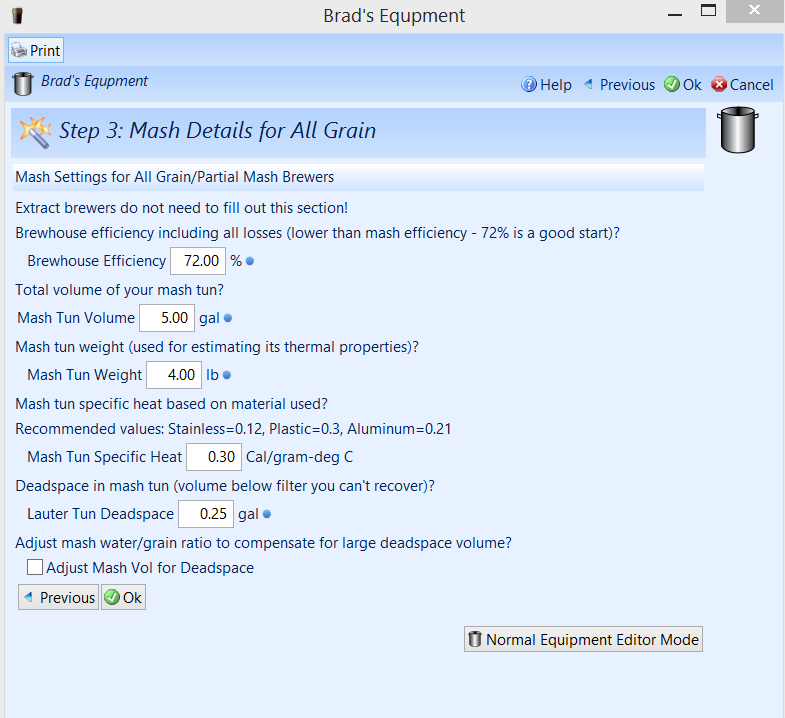 The third page shows settings for all grain and partial mash brewers. These are used to define your mash tun, all grain brewhouse efficiency and temperatures for mashing grains.
If you are an extract brewer and not mashing your own grains, you can leave the default values and click the OK button to finish your equipment profile.
If you are an all grain or partial mash brewer you start with the first field which is the Brewhouse Efficiency. Brewhouse efficiency is a measure of how well your overall brewing system performs with regards to converting grains into gravity points in the fermenter. Typical values for home brewers are in the 65-75% range though higher values are possible depending on your particular setup. A good starting point is 72% if you don’t know this value up front.
Brewhouse efficiency is not the same as mash efficiency (explained here). Mash efficiency measures the percent of sugars extracted only in the mash step, while brewhouse efficiency includes losses in later steps so brewhouse efficiency is always lower than mash efficiency.
If you brew a batch and measure the original gravity (OG) and find out its a bit on the low side, you will want to lower your brewhouse efficiency number for the next batch. Conversely if you find the OG is higher than expected you want to adjust the brewhouse efficiency up before brewing again. After a few batches you should have a pretty consistent number dialed in.
Note, however, that your efficiency will go down when brewing high gravity beers. This is due to the fact that you have a very large amount of grain in the mash tun and a relatively small portion of sparge water which will leave some sugars behind. So if you are brewing a high gravity recipe you may want to adjust your efficiency down a bit to compensate.
Next is the Mash Tun Volume, which is simply the capacity of your mash tun or pot if you are mashing in a pot (such as Brew-in-a-bag). Similarly the Mash Tun Weight can be entered directly. The weight is used along with the specific heat (below) to estimate the thermal characteristics of your system.
The Mash Tun Specific Heat is a value used to determine how much “extra” energy may be needed to heat up your mash tun when mashing in. If you are using an infusion or decoction mash step, a certain amount of energy goes to heating up your grains, but some additional energy is needed to heat the mash tun itself.
I recommend using one of the listed values depending on what your mash tun is made of. For example a plastic mash tun would have a specific heat of 0.3 while a stainless mash tun (or stainless pot) would be 0.12.
If you later find that that you are low on your target mash temperature, you can increase the specific heat to compensate. If you are too high in temperature when mashing in, adjust the specific heat a bit lower to compensate for the next batch.
The final two entries have to do with deadspace which is volume lost in the mash tun. Typically this is the volume below the mash screen and below the outlet for the mash tun. There is also a checkbox for adding more water volume to the first mash step to compensate for cases where there may be a large mash tun deadspace.
Finally if you press OK you are done – you now have an equipment profile you can use for brewing beer. You can go back to Profiles->Equipment view if you want to edit your profile in the future, and you can also go to Options->Brewing if you want to set one equipment profile to be the default when you create a new recipe.
As a reminder I have a video tutorial on creating an equipment profile here.
Thanks for joining me on the BeerSmith Home Brewing Blog. You can grab a trial version of BeerSmith from BeerSmith.com. Be sure to sign up for my newsletter or my podcast (also on itunes…and youtube…and streaming radio station) for more great tips on homebrewing.
Hello BS blog team, I’m an all grain brewer that currently use 2 tuns, one for mash(stainless) and other for boil (Al).
Should I set my equipment profile for which type of tun? Or should I create two profiles and consider each step for related tun?
Can Beer Smith make adjustments for brew in bag brewing (e.g. if I wanted to brew a 5 gal batch using an 8 gal pot and a brew bag)?
Yes – here is info on doing it: http://beersmith.com/blog/2016/11/23/brew-in-a-bag-biab-beer-brewing-with-beersmith-software/
I am a new brewer 2 brews under my wing. A fat tire that came out at 6.11 ABV and a Kolsch that came out very good at a normal ABV of 5.2. My question is I am using a Fermentasauras and I am not sure how to set the Fermentation profile for that. It ferments under pressure with a spunding valve. Any suggestions?