In Part 2 of my Blichmann BrewEasy detailed review I brew some beer, and record my experience and lessons learned with the new system. Last week in Part 1, I gave an overview of the system specs, setup and my first impressions.
[Note – this is a very long post – and full disclosure: Blichmann Engineering is a supporter of the BeerSmith podcast and websites, and affilitate links are used in this article]
The Recipe – A Simple Belgian Wit
I picked a staple beer of mine which I’ve brewed many times – my Belgian Wit. I posted the full recipe on the cloud as brewed here. Its a fairly low gravity 1.050 beer typically made with half barley and half flaked wheat. I switched to 60% barley and 40% wheat for this first brew to avoid a stuck sparge, though my fears turned out to be misplaced as the false bottom on the BrewEasy performed very well. Total grain was only 22.7 lbs (10.3 kg) for a 11 gal (41.6) liter volume into the fermenter.
Test Run and Calibration
I did a quick test run of the system with plain water before brewing on it. I wanted to understand how it worked and also to calibrate the thermometers for accuracy to avoid any surprises on brew day. I added water and started recirculating it with a 100 F set point. I then checked water temperatures on both kettles with both a conventional floating thermometer and digital thermometer and caibrated the Blichmann thermometers to them.
This also gave me a chance to experiment with the auto-sparge arm and correct flow rate for the March pump, which turned out to be about 1/3 open. That way I did not run the risk of running a pot dry or overflowing a pot during actual operation. They were not hard to dial in, but it did take a few minutes to get the right flow rates.
Heating the Mash Water with the BrewEasy
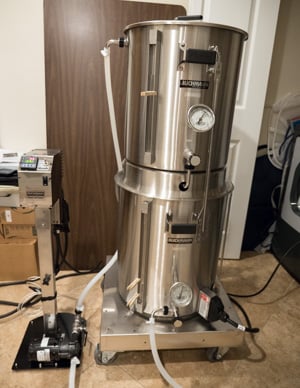
I’m going to go into some detail on operations here, but the operation of the system is relatively simple for a semi-automated system. If you recall from part 1, the BrewEasy is a two vessel system with a March pump that recirculates water from the lower boil kettle into the top of the mash tun, while gravity drains water from the mash tun to the boil kettle.
I filled the boil kettle first with just over 17 gallons of water and started heating the water in it while I assembled the adapter and mash tun. Once I had the pump set and primed I set my strike temperature of 157 F (70C) on the Tower of Power controller and set it to auto and started pumping.
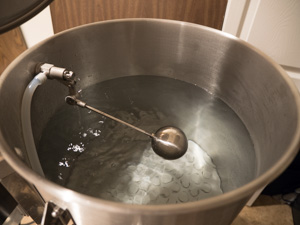
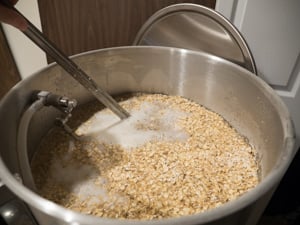
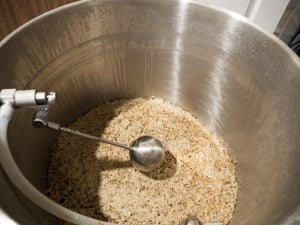
While the mash tun was filling I set the level on the auto-sparge arm (shown in the picture). All you do is adjust the float to close the valve near your desired water volume. I set it to close at roughly an 8 gallon level, dividing the water between the mash and boil kettles. I also installed the drain tube on the bottom of the mash tun so I could recirculate the hot mash water.
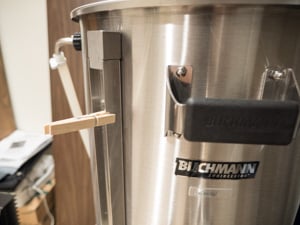
To monitor the volumes in both vessels I ended up attaching a clothes pin to the sight glass on each kettle. The etched volume markings are hard to see from a distance, but with the clothes pin I could easily see if the level had changed in either vessel. The boil coil requires a minimum of 5 gallons of water to remain submersed so I also marked that on the sight glass to make sure I did not go below that level.
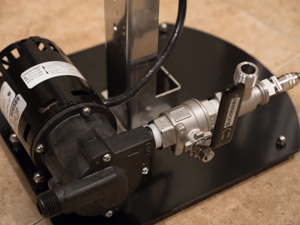
As the mash tun reached the target volume I throttled down output on the march pump and opened up the drain valve on the mash tun to let the water begin to recirculate. The March 815 pump is capable of pumping around 8 gallons a minute so you don’t want to run it wide open during recirculation. I found a happy medium with the ball valve about 1/3 of the way open. Once you have this dialed in, the auto sparge arm does the rest of the work and maintains a constant volume in both the mash tun and boiler.
Temperature Control
Because the Tower of Power LTE has its temperature sensor on the output of the pump and not on the mash tun itself there is a small difference between the temperature you set on the Tower of Power and the temperature of the mash tun. For most users this is 3-4 F (1-2 C), so I ended up dialing in a temperature of 161 F (71.7 C) to hit my desired 157 F (70 C) dough in for the mash tun.
I personally was well aware of this difference, and found it to be no big deal to add a few degrees when setting temperatures. You can monitor the actual mash temperature using the large thermometer on the mash tun at all times, and its not hard to understand that the boil kettle and pump are going to run a few degrees hotter to maintain the temperature of the mash tun which has no heating element itself.
The unit easily maintained that temperature within less than a degree once it reached steady state.
Doughing In the Grains
Once my strike temperature was reached, I turned off the pump for a minute, closed the valve on the mash tun and doughed in my grains. I was concerned that using so much flaked wheat might result in a stuck sparge, so I removed the drain tube from the mash tun and did a quick vourlauf into a small container. I was happy to see that almost no grain particles made it through the false bottom, so in the future I will likely skip the vourlauf.
Next I had to reset the level on the auto-sparge arm to account for the combined water/grain volume. I set it to be about 2″ above the grains so the grain bed would remain floating.
The drain tube from the mash tun comes with various size rubber grommets that have different size holes to manage the gravity flow into the boiler. I installed the recommended 1.25 gal/min size grommet which gave me a good strong flow without sucking too much water from under the false bottom. Once the tube was in place, I opened the valves and restarted the pump to recirculate.
As soon as I started recirculating again the temperature quickly came up to my target mash temperature of 152 F (67 C). I dialed that temperature into the tower of power controller (plus the 4 degree offset) and let it recirculate.
Finishing the Mash
The rest of the mash was pretty boring. I had time to clean and prepare some of my chilling/fermenting equipment. I occasionally stirred the top of the grain bed a bit to avoid hot spots, but I was getting very strong recirculation through the bed and no signs of a stuck sparge. The false bottom on the mash tun performed very well. Near the end of the mash I dialed in my mash-out temperature and waited for the system to heat up a bit.
When the mash was complete, all I had to do was turn off the tower of power and pump, and then let the wort drain from the mash tun into the boil kettle. When I had sufficient volume, I turned on the boil-coil heater to start pre-heating the wort for the boil. Once the mash tun was fully drained, I removed the drain tube, lifted off the mash kettle and removed the adapter.
Boiling the Wort
Achieving boiling wort with the 5,000 watt (240 volt) boil coil was not difficult at all. I started running it at 100% power but eventually dialed it down to 90% as the wort started to boil. The 20 gallon (75 l) kettle was more than sufficient for the boil, and I probably could even brew a lower gravity 15 gal (56 l) batch using this system.
This recipe required only a single hop addition. I decided to use a hop bag this time as I was not sure how well the Anvil kettle strainer might perform. However I tossed the coriander and bitter orange peel in with no bag. Again I think my fears were unfounded as the kettle strainer did a great job of separating the wort and trub after the boil.

Chilling with the Therminator and Thrumometer
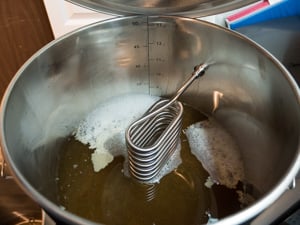
The optional Therminator plate chiller chills your wort while you are transferring it to the fermenter. It is set up with cold water flowing in one direction through garden hose fittings, while wort flows in the opposite direction as it travels from the pump to the Therminator and into the fermenter.
I installed the Thrumometer (inline thermometer) on the output between the Therminator and fermenter so I could monitor the temperature of the transfer. Next I just turned on the garden hose cold water supply, and then slowly released the valve on the March pump. You do need to slowly adjust the output flow on the pump until you reach your target fermentation temperature – in my case 68 F (20 C) for the wort. The transfer can be done very quickly – I moved 11 gallons of wort and chilled it from near boiling to 68 F in less than 15 minutes.
The Anvil Kettle strainer actually exceeded my expectations. I had quite a bit of trub from the proteins of the unmalted wheat and also coriander and orange peel additions, and it did a great job of separating them. Even when I dumped the yeast plug in the conical after a few days of fermenting there was very little hop or external sediment in it.
I used a stainless conical fermenter from SS Brewtech (review coming on that soon), which fills from the bottom so it was not difficult to monitor the volume and temperature of the wort in the fermenter as well.
When I finished, I sealed up the fermenter, aerated with an Anvil Oxygen wand and pitched my yeast starter. The oxygen wand uses disposable oxygen bottles from the hardware store and is one of my new favorite pieces of equipment – pure oxygen can fully aerate a batch in 60-90 seconds. and I’ve also used it on mead and cider.
I did backflush the Therminator immediately using the optional backflush hose. This was the recommended procedure to avoid getting any bits of grain or hops stuck in the plate chiller, and it seemed to be effective.
Cleanup for the rest of the system was pretty straightforward. I rinsed out the mash tun and trub, then recirculated hot PBW through the system first followed by recirculation of clean water. The stainless steel was very easy to clean, and it was also very easy to remove the valves and drain tubes to clean and air those out after brewing.

Performance and Lessons Learned
My original gravity for the batch was 1.049 actual vs 1.050 planned, which was just fine with me for a first time run. My boil volumes came in a bit high so I did boil a bit longer than planned – I think I got a bit more water out of the grain bed than I might have with a conventional sparge.
One issue some have noted with this system is that the overall brewhouse efficiency runs a bit low – 65-67% in most cases. Again this is not a huge issue for me – brewing a typical 10 gallon (38l) batch I calculated you need roughly 2 lbs (2.2 kg) of extra grain versus a typical 71% efficient system. For the cost of 2 lbs of grain, I’ll probably not spend too much time trying to get an extra percent or two out of the system.
The trub loss, which I had estimated at 0.5 gal (2 l) was actually closer to a gallon (4 liters), probably due to volume lost to the chiller, pump and tubing and not actual trub left in the pot. Overall it turned out to be roughly a wash on volume into the fermenter. Likely the slighly low gravity was related to my volumes being a bit off.
A few lessons I learned along the way:
- The test run to calibrate the thermometers was worthwhile as one thermometer was off a bit and it also taught me how to dial in the auto-sparge arm and manage the pump.
- As mentioned, you need to set the mash temp on the controller a few degrees higher than your desired mash temperature (3-4 F or 1-2 C)
- Throttle the output on the pump to 1/3 or less when recirculating the mash, as the March pump which moves 8 gal/min (24 l/min) will otherwise drain the boil kettle.
- Use waterproof gloves when adjusting the sparge arm – I tried to adjust it by hand after doughing in with 156F water and found out quickly why that was a bad idea!
- Twice I forgot to hit “enter” on the Tower of Power when adjusting temperatures. This is purely a user error as the darn thing flashes while you are setting it, but it did slow me down at one point as the system was still holding the “old” set temperature.
- The false bottom on the mash tun and Anvil Kettle strainer performed better than I expected, so I would not hesitate to do a 50% wheat grist in the future or use unbagged hops.
- After my first batch I did add an additional “purge valve” on the inlet of the pump only to make it much easier to prime the pump. This is not a problem with the BrewEasy, but with just about any brewing pump (which are not self-priming). Adding a small valve makes it easy to purge air from the inlet hose and prime the pump quickly.
Overall Impression
Though the Blichmann BrewEasy system has been out for several years now, I think the system is still a top performer and competitively priced when you compare it against other 10 gal (38 l) turnkey brewing systems. Currently single vessel (BAIB-style) systems are its only real competition near this price point and I believe the BrewEasy offers more flexibility for the brewer to reconfigure or expand their system later, reusing the BrewEasy kettles, pump and controller. Even low gravity 15 gal (56 l) batches are possible using this system. The quality is simply outstanding.
As far as negatives, I am considering changing out the plastic polysulfite head on the March pump for a Chugger stainless head, but that’s relatively inexpensive and requires removing only four screws. The polysulfite head performs well, but considering everything else is stainless, I might just spring for the replacement head. The only other negative for some may be the slightly low brewhouse efficiency (65-67% vs 70-72% for a typical system) but as I pointed out that’s only an extra 2 lbs (1 kg) or so of grain per batch to compensate, which is a small expense.
I did find it easy to manage the recirculating mash system. All I really had to do is set the auto-sparge arm level for my desired volume and dial back the output on the pump to about 1/3 to maintain a constant recirculation. The tower of power was simple to operate once you realized you need to add 3-4 degrees F to the set temperatures to achieve a given mash temperature. The kettles and false bottom performed flawlessly and were easy to clean up.
Boiling was simple thanks to the powerful 5,000 watt boil coil, and when I paired the BrewEasy March pump with the (optional) Blichmann’s Therminator chiller and his Anvil Kettle Strainer it took less than 15 minutes to take 10 gal (38 l) of wort from a boiling hot kettle to 68 F (20 C) in the fermenter.
Overall I’m very impressed with the Blichmann BrewEasy. As I mentioned in part 1 of the review the G2 kettles and stainless fittings are works of art, and I have little doubt that I could hand them down to my son when I’m too old to brew anymore. The boil-coil has plenty of power for the system and the Tower of Power controller is simple to use and flexible. The March 815 pump provides plenty of wort-moving capability and can be used in a variety of ways during brewing, transfer and cleanup.
How good is it? We’ll I’ve converted my old mash tun into a chill water source for my conical fermenter now, and I’m seriously considering giving away my old pots from the 1990’s which are now gathering dust in the garage. Even my old rusted propane burner may soon make its way to the dump.
Thanks for joining me on the BeerSmith Home Brewing Blog. Be sure to sign up for my newsletter or my podcast (also on itunes…and youtube…and streaming radio station) for more great tips on homebrewing.
Can you provide your equipment profile?
I’m still dialing it in a bit to get the volumes right but drop me an email at beersmith at beersmith.com and I’ll send it to you.
Hi Brad,
Did you figured out any profile to this kind of Kettle setup?
I don’t have the Blichmann ones, but a really similar made with Aluminium Kettles, basic the same setup, with 5 gallons.
It’s a Large Boil Tun with 8,5 Gallons and a Mash Tun with 5 Gallons.
I’m using a BIAB setup with no-sparge option. But not getting optimal results in water qty etc…
I did – I use a BIAB mash profile which gives me total water in the overall system and simply use that amount of water. Once I have it up and running I split the water between the mash tun and boiler to keep the boil coil covered with water. After adding the grains I will adjust the water amount in the mash tun to keep the grains floating.
As for overall volumes, I’ve been measuring volumes for each step and dialing them in – I was a bit high on my boil volumes initially but have a pretty good handle on them now.
Hi Brad,
English is not my natural language, so some times a double confirmation don’t hurt…
When you say…
“After adding the grains I will adjust the water amount in the mash tun to keep the grains floating.”
You mean, controlling the in and out valves do stabilize the water level in mash tun?
Or…
Add real water on the system?
Actually on this system you just adjust the float valve, which controls the mash tun liquid level, to be a few centimeters above the level of the grain bed so the water level in the mash tun is high enough to keep the grain bed floating.
Understood!
Mine is little bit different, as I use 2 ball valves, so I keep my eyes on mash tun to keep the water level, using the inlet valve and the drain valve to control the water volume.
But is the same principle…
Tks for the clarification!
Hi again Brad…
Let me ask you something…
How did you setup the equipment profile for this kind of two tuns?
The main difficulty I have is to setup the losses and the volume for mash and boil tun, as we have a 2 tuns acting as one…
I have a 1.5L loss in the mash tun and 3.2L on boil to trub and dead volume…
The volumes are 32L and 20L…
Any advice on setup this?
Brad, as a BrewEasy user, this article was very useful. Thanks for the great work.
You listed water additions, with the base water listed as “Brad’s Water.” Can you share if that is RO water, or something else? The EZ Water spreadsheet indicates your salt additions to my local SC water (relatively soft) yields about 100 ppg Calcium as Blichmann recommends. However, the calculated pH is 5.78, just above the limit I normally target for all beers.
I treat it as one large BIAB system and simply make sure I maintain enough water in the lower kettle to keep the heating coil immersed. So I use a BIAB mash profile in BeerSmith with my equipment profile which gives me a target mash in temp I can set. After mashing in I just dial it down to the target mash temp and continue recirculating.
Drop me an email and I can send what I use. I basically target the low to mid ranges for the acid adjustments using the water profile tool in BeerSmith. It seems to work well for most beers. After everything my water comes in just over 7 pH which is fine.
Hi Brad,
Looking to upgrade to this system, but unsure what would be the advantage of going with the full tower of power vs. the LTE tower of power.
Thanks!
Just finished both of your Blichmann BrewEasy articles. I have a the 10 Gal system and just recently converted to the 20 Gal systems with the 2/ 30 Gal pots. You are correct, it’s easy to upgrade the system. I have a question, for ease of clean up I have been using a bag in my mash ton. I have not really noticed a difference in the efficiency and it is a tremendous help with clean up. I have a hoist over the system that allows me to pull up the grain bag and drain it, then ultimately I lower back down into my raw grain bag to dispose of it. Wondering if you see any potential pitfalls from using the bag? Also wondering if you can talk a little about PH and how it is effected when you are starting with all of your sparge and mash water at the same time. I have read a little bit about it and from what I understand the larger amount of water has diminished impact in PH during conversion that needs to be considered when adjusting PH. Thanks!
Great reads. Thanks for posting this series. Looking to build out a similar system with my existing kettles. Do you think the full stand with flow meter, valve and sample port would be worth the money if you could do it over again?
I am seriously considering buying a 10g Breweasy system, but I was wondering what are the limitations if any on highest gravity 10 g batch you can brew with the system? My back of the envelop calculation would suggest your max OG 1.085.
Hi Brad ! I was reading your blog about the Blichmann Breweasy from January 2017 . At the end of the blog you said that you in the process of dialing it in. I currently have beer smith 2 and am trying to dial the system in . I have the same system as you decribed including the 14 gallon SS Brewtech fermenter. I am asking if you could send me the profile info that you are currently using for the system so that i can get my system dialed in . I would greatly appreciate it . Thanks Dale Guerrette daniedag@gmail.com
hello, sorry for my english, I set up a system similar to the blinchman, and when I set the mash I notice the difference if I add biab or temperature, the water volume increases considerably, because the biab absorption of the grains is lower, compare that difference?