 Sitting next to a big pot of boiling wort is my favorite part of the brewing process (except for tasting of course!), and cleaning is my least favorite part. But after you boil you face the challenge of what to do with 5, 10 or 15 gallons (19-57 liters) of really hot wort. So this week we take a look at options for getting your boiling hot liquid down to fermentation temperature quickly.
The Big Chill
Why is it important to chill your wort quickly after the boil? First, cooling your wort quickly helps to prevent infection. Above 140F (60 C) your beer is too hot for bacteria, but below that you run the risk of infection. Second, hot wort continues to produce dimethyl sulfide (DMS) which can produce some off flavors, so chilling cuts off that process. Finally, chilling your beer fast results in a “cold break” where many of the proteins from the grains will fall quickly out of the wort. In fact, one potential cause of chill haze in a finished beer is not cooling your wort quickly enough.
The Ice Bath
Most extract brewers use a combination of cool top-up water (to bring their volume up) and an ice bath to chill their wort. I find that about 20 lbs of ice in the sink will effectively chill 3 gallons of wort to near room temperature, and then I can use some additional chilled water to get it down to my fermentation temperature. This is a simple and effective method for beginning brewers. Just make sure you measure the temperature and get at least down to the low 70’s before pitching your yeast.
The problems with the ice bath become apparent when you try to scale up to a larger batch. A full 5 gallon (19 L) boil is on the edge of what most people can do with an ice bath. Beyond that, you are probably talking about immersing your pot in a full bathtub, and you also run into the significant problem of figuring out how to safely transport 10 or more gallons (38+ L) of wort from your burner to your tub.
An Immersion Coil
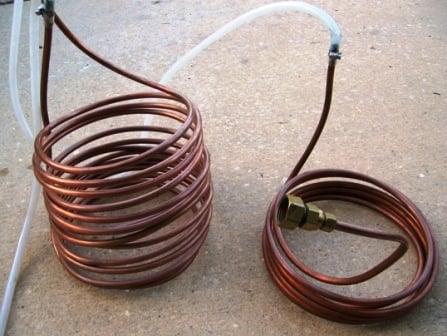
The next step up in wort chilling is a simple immersion chiller, like the one pictured above. I still use one I made from some 3/8″ copper tubing I wrapped around a large coffee can. You can get the tubing and fittings from your local hardware store, or purchase a complete unit from many homebrew stores. The coil is typically hooked up to the sink or a garden hose. Cool water runs continuously through the coil which is immersed in the pot. A good immersion chiller can cool your wort down to room temperature from boiling in about 20 minutes.
The Two Stage Immersion Chiller
One problem with immersion chillers is that they will initially cool the wort very quickly, but tend to slow down as the wort approaches room temperature. The rate of cooling is directly related to the temperature differential between the wort and cooling water flowing through the coil. If you are using regular tap water near room temperature to chill, those last few degrees can take a long time.
This is where a secondary coil, such as the second coil in the picture above, can really help. The second coil is placed in a separate ice bath in another pot or bucket on the inlet side of the primary coil. This cools the water going into the chiller by a few degrees which gives the needed temperature differential to accelerate the cooling. Its a great trick to use, particularly in the summer when your tap water might be a bit on the warm side.
Counterflow and Plate Chillers
Counterflow chillers work by essentially having one tube inside of another. The inner tube typically contains the wort, while the outer tube has the cooling water. The wort is pumped in one direction while the chilling water is pumped in the opposite direction, cooling the wort in a single pass as it is pumped from pot to the fermentation vessel. A plate chiller works in a similar manner – except the heat exchange is accomplished by a network of small plates with a large surface area within the device. Both units are often used with higher end brewing systems that have pumps to transfer wort.
The main advantage of plate and counterflow chillers is speed – in the time it takes to pump (or siphon) the wort from the pot to fermenter it is cooled. Depending on how cold your chilling water is you can reach fermentation temperature in one pass. However, if your cooling water is not cool enough it can still take some time to reach your target temperature – requiring either multiple passes or just waiting for the wort to cool by itself.
One disadvantage of this type of chiller is that it can leave more of the hot break in the fermenter. Because the chilling happens very rapidly in the device as the wort is pumped into the fermenter, the hot break also occurs in the device and will be pumped into the fermenter. This is not a significant problem (most commercial breweries use these devices), but some purists prefer to leave their hot break in the pot. Also you need to be careful to flush these devices with cleaning fluid immediately after use.
Conclusion
I’m not wedded to a single method for chilling wort. I think an ice bath is a great solution for those brewing small stove top batches or just starting out. An average all grain brewer brewing 5 or 10 gallon (19 or 38 L) batches will be well served by a single or dual stage immersion chiller. As you move up to larger systems (15+ gallons) where you have access to a pump and also want to save time, then investing in a plate or counterflow chiller really may make sense for you.
The key to great beer is to get the wort cooled as quickly as possible to protect your beer from infection and DMS and also to get that cold break. Thanks for joining me on the BeerSmith Home Brewing Blog. Be sure to sign up for my newsletter or my podcast (also on itunes…and radio station) for more great tips on homebrewing.
Love your posts, software and blogs. A question maybe you can shed some light on. Making an Citra Melon IPA, using whirlpool. Just got a Hop Blocker and the HB video said stir (whirlpool) for 10 minutes and let set for 30 to settle out the trub. Every place I read, including this post says ” wort cooled as quickly as possible to protect your beer from infection …”. how does that reconcile with what Blickmann said in the video?
On another note, I’ve read that double or even triple bagging with result in less hop trub, others say just toss in the pellets. Does double bagging allow for enough circulation to really get the hops in contact with the wort? Boiling I can see, at it gets bounced around a lot, but at 0 minutes or whirlpool? i always seem to get a ton of stuff and am working to try to get less.
BTW: Like your presentation at NHC, glad you can make a full time job out BeerSmith passion.
B
I use an even better 2 stage chiller. Before you brew, get a utility pump, some garden quick disconnects, a cooler, and a large bag of ice. Place the utility pump in the cooler and then place the ice in the cooler. Close the lid and begin your brew session.
When it’s time to chill, start off with tap water with your immersion chiller until you get down to a reasonable temperature (120 or so? Depends on your tap water temperature). At that point, spill about a gallon or so of your chiller discharge water into the cooler, switch your chiller connection to the output of the pump, and turn on the pump. Suddenly you’ve got ice water to do your chilling with. Continue to leave the discharge of the chiller running into the cooler so that the cooler/pump has a continuous supply of liquid water.
This technique can chill 15 gallons of beer very quickly. You’re only limited by the amount of ice you put into the cooler.
I know you said ‘get your wort temp down quickly’ but what is your opinion on Cube cooling that seems to be used by a lot of the BIAB brewers (not all of course).
I have had great success cooling 10 gallons of wort with an immersion chiller and a a small submersible fountain pump that sits in a cooler of ice water, that ice water is pumped through the chiller. Seems to work pretty well. The water in the ice chest is replenished with tap water, which this time of year is roughly 85 degrees. It takes about 6 10lb bags of ice to get the wort down to 70 degrees.
“One disadvantage of this type of chiller is that it can leave more of the HOT BREAK in the fermenter. Because the chilling happens very rapidly in the device as the wort is pumped into the fermenter, the HOT BREAK also occurs in the device and will be pumped into the fermenter”.
Surely you mean COLD BREAK, here?
Good review, Brad. I agree with the hot to cold break comment from Martin. I changed over to a Blichmann plate chiller, and I use the icebath prechiller, it always allows me to flow the wort faster, with less ground water used. In the early Fall, our ground water can be in the low 70’s in Central NY, so even slow wort flow won’t work to get to the upper 60’s.
Pingback: Review of Top Heat Exchangers for Brewing: The Complete Guide to Efficient Wort Cooling Systems - brewmybeer.online