 This week I take a look at the pesky problem of beer keg system leaks in a typical homebrew system including how to find and correct them. A keg system leak can lead to an empty CO2 tank, flat beer and even a catastrophic beer leak pouring 5 gallons (19 liters) or more of beer under pressure into your refrigerator.
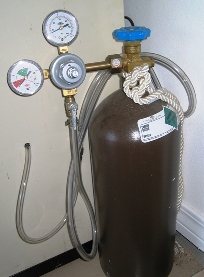
Potential Sites for System Leaks
Any seal in your keg system is a potential site for gas or beer leaks, so when you assemble a new system or add a new keg it is worthwhile to take a few minutes to check these locations:
- The CO2 Regulator – The interface where your regulator attaches to the CO2 tank is a very high pressure seal, typically running at about 800 psi. Even a small leak here will rapidly deplete your CO2 tank. When you refill your CO2 tank you will often get a crush seal that looks like a paper or cardboard ring you can use to help seal the tank-regulator interface. Some people prefer to run without the seal, but in either case try not to overtighten the large nut as it can lead to leaks.
- Gas Side Hoses – All of the hoses on the gas side of your system are potential leak points. Typically this happens where the hose is clamped to the regulator or quick disconnects.
- Beer Side Hoses – Though leaks on the beer side are a bit more obvious, you can get leaks on any of the beer side hose clamps.
- Quick Disconnects – You can get an improper seal between the quick disconnects and posts on your keg. Often some keg lube on the post will resolve this issue.
- Keg Top Seal – The large oval seal at the top of your keg can also leak, usually because it was turned or askew a bit when you sealed the keg. Also spraying the keg seal with some star-san when closing your keg will help it seal better.
- Keg Valves – The poppet valves on the keg posts can also leak, particularly if you don’t have an quick disconnect over them. Usually poppet leaks can be resolved by removing the keg post and cleaning out the valves thoroughly, though in some cases you may need to replace the valve.
Methods to Test For Leaks
- Bubble Method – One simple way to check for leaks is to mix a small amount of Starsan sanitizer and water in a spray bottle (or dish soap if you don’t have Starsan) and spray it (or pour it) on the interfaces above when the system is under pressure. The Starsan will bubble at the side of any leak making it pretty obvious if you have a bad seal.
- High Pressure Test – If the bubble method above fails, one trick I’ve used in the past is to turn the system up to a higher pressure – say 25 psi – and check again using the bubble method above. Often leaks that are very slow at low pressure will become quite obvious at higher pressure. As always remember “safety first” and keep your system well below the pressure limits of your kegs and equipment.
- Static Test – On a new keg system I will also often do a static test where I pressurize the system and then turn off the gas supply to see how long the system can remain at my operating pressure. Its important to do this without beer in the system as the beer will absorb CO2 over time. If the system holds for a day or two then its good to go. If it seems to be losing pressure, I’ll then try the test again, limiting components until I can find the leak or use the bubble test or high pressure test to isolate the leak.
Have a tip on eliminating keg links? Leave a comment below. If you have your own thoughts on sour beer techniques please leave a comment below. Thanks for joining me on the BeerSmith Home Brewing Blog. Be sure to sign up for my newsletter or my podcast (also on itunes…and youtube…and streaming radio station) for more great tips on homebrewing. Also check out the How to Brew Video series I shot with John Palmer if you want to learn more about all grain brewing.
If your system is equipped with a gas distribution manifold a quick and effective check is to drop the manifold and hose assemblies into a sink full of water and look for bubbles. Use this method when you have performed the checks in this article and failed to find the leak(s). While everything is submerged, open and close all of the valves. I have found valves that only leak in the open position using this method.
Also, when looking for CO2 leaks, don’t forget the cylinder itself. I have found leaks around the valve stem when it is open or partially opened and where the valve assembly mounts to the cylinder.